So, picture this: it’s a chilly October afternoon, and I’m standing in the kitchen with my kiddos, trying to whip up some Halloween goodies. My son, dressed as a zombie, is debating whether to dip his fingers in the flour or not, while my daughter is insisting on adding “extra spooky” decorations. Amid all this delightful chaos, I decided it was time to bring out the big guns—Brain Cupcakes. ME? OBSESSED? You bet! These deliciously creepy cupcakes not only save the day but also spark some serious giggles. Kids go wild for them, and let’s be honest—they’re a hit with adults too. There’s something irresistibly fun about serving up cupcakes that look like brains, plus they’re SO GOOD with that rich chocolate flavor. Trust me, these treats are what Halloween dreams are made of!
Why You’ll Love This Recipe
- Quick: Whip these up in about 30 minutes for a last-minute Halloween bash.
- Budget-Friendly: Using a box mix keeps costs low while packing in flavor.
- Crowd-Pleaser: They’re not just cute; they’re rich, delicious, and perfect for all ages.
- Kid-Approved: My children giggle and squeal every time I make them.
- Different: Instead of traditional cupcakes, we’re going for a spooky theme that adds a dash of fun.
Ingredients Needed and How to Make It
Ingredients Needed
Let’s tackle the goods you’ll need for these spooky delights. You’re gonna love how simple this is:
- Base:
- 1 box of chocolate cake mix
- 3 eggs
- 1 cup of water
- 1/2 cup of vegetable oil
- Topping:
- 1 can of white frosting (the creamier, the better!)
- Red food coloring (to add some dramatic flair)
- Chocolate syrup (for that gooey, delicious drizzle)
- Chocolate chips (just because they make everything better!)
How to Make This Recipe?
Now, let’s get into the nitty-gritty of making our Brain Cupcakes.
Step 1: Preheat and Prep
First thing’s first: Preheat that oven to 350°F (175°C) and grab yourself a cupcake pan. You gotta grease it up nice and good, so the cupcakes don’t stick like last year’s haunted house decorations.
Step 2: Mix and Blend
In a mixing bowl, toss in the chocolate cake mix, eggs, water, and vegetable oil. Mix it all up until it’s well combined—think smooth and luscious, not a lumpy mess! You want that batter running off the whisk like a chocolate fountain at a party.
Step 3: Fill ‘Er Up
Pour the batter into the greased cupcake pan, filling each cup about 2/3 full. This gives them room to rise and even out.
Step 4: Bake It Up
Pop those babies in the oven for about 18-20 minutes. You know they’re ready when a toothpick inserted comes out clean. Cue the heavenly aroma wafting through your kitchen while you patiently (or not-so-patiently) await the transformation.
Step 5: Cool Down
Let the cupcakes cool completely before you go slapping on that white frosting. Trust me, you don’t want a melted frosting situation going on here.
Step 6: Frosting Fun
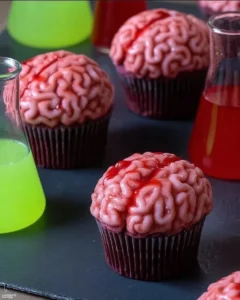
Frost each cupcake generously with white frosting. Grab a piping bag (or a ziplock if you’re feeling crafty) and pipe on some extra frosting in the shape of a brain. Don’t worry if it’s not perfect—spooky is the aesthetic we’re aiming for!
Step 7: Drizzle and Detail
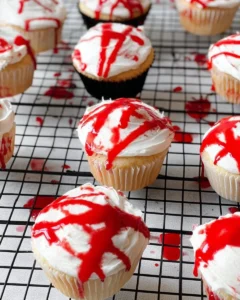
Now for the fun part! Drizzle chocolate syrup over the top, and then use that red food coloring to add some details—think veins.
Step 8: Sprinkle Some Love
Finish it off with chocolate chips for a bit of crunch. They’re like little eyeballs on your creepy treats!
Step 9: Serve and Enjoy
Now it’s showtime! Serve these creepy cuties at your Halloween party and watch as everyone marvels at your skills. They’re sure to be the star of the show!
How to Store It & Expert Tips
How to Store It
These cupcakes are best enjoyed fresh, but if you have any leftovers (which is hardly ever the case), pop them in an airtight container. They’ll last in the fridge for about 3-4 days. For longer storage, you can freeze them for up to a month. Just make sure to thaw them overnight in the fridge before diving back in!
Expert Tips
- Mix it Up: Love a little twist? Try adding a splash of vanilla or almond extract to the batter for extra flavor.
- Frosting Hack: If you’re feeling extra spooky, tint some of your frosting with a little green or blue food coloring to give an eerie glow.
- Chocolate Chips: Instead of regular chocolate chips, try using mini ones! They’re perfect for that “brain texture” look.
Conclusion
So there you have it, folks! These Brain Cupcakes are an easy, fun way to bring a touch of spookiness to your Halloween festivities. They’re quick, budget-friendly, and packed with flavor that folks of all ages will adore. Give ’em a try and let me know how they turn out. If you enjoy these, I’d love a star rating down below! And feel free to share this with your cousin who never shows up empty-handed.
Did you add your own spin? I wanna hear it!
FAQ Section
Q: Can I make these cupcakes ahead of time?
Here’s the deal: You can make the cupcakes a day ahead and frost them on the day of your party. This keeps them fresh and delicious!
Q: What if I don’t have a piping bag?
Real talk: A ziplock bag works wonders! Just snip a corner off, fill it with frosting, and pipe away; it’s a total game-changer.
Q: How do I make the frosting colored?
Easy peasy! Just add a few drops of food coloring to your frosting and mix it up until you reach your desired shade. Go wild!
If your sweet tooth isn’t done yet, my Chocolate Chip Banana Bread is another fantastic way to delight your crew. Happy baking!
Brain Cupcakes
Ingredients
Base
- 1 box chocolate cake mix Using a pre-made mix for convenience
- 3 pieces eggs Large eggs recommended
- 1 cup water At room temperature
- 1/2 cup vegetable oil
Topping
- 1 can white frosting The creamier, the better!
- to taste red food coloring For adding veiny details
- to taste chocolate syrup For drizzling
- to taste chocolate chips For garnish
Instructions
Preparation
- Preheat oven to 350°F (175°C) and grease a cupcake pan.
Mixing
- In a mixing bowl, combine chocolate cake mix, eggs, water, and vegetable oil. Mix until smooth.
Baking
- Pour the batter into the greased cupcake pan, filling each cup about 2/3 full.
- Bake for 18-20 minutes, or until a toothpick comes out clean.
- Let the cupcakes cool completely.
Frosting and Decoration
- Frost each cupcake generously with white frosting, piped into a brain shape.
- Drizzle chocolate syrup over the top and use red food coloring for vein details.
- Top with chocolate chips for extra crunch.
Serving
- Serve at your Halloween party and enjoy!