Cozy Cherry No-Bake Dessert
A layered no-bake dessert featuring a buttery graham crust, a creamy cheese layer, and a glossy cherry topping. Perfect for potlucks and special occasions.

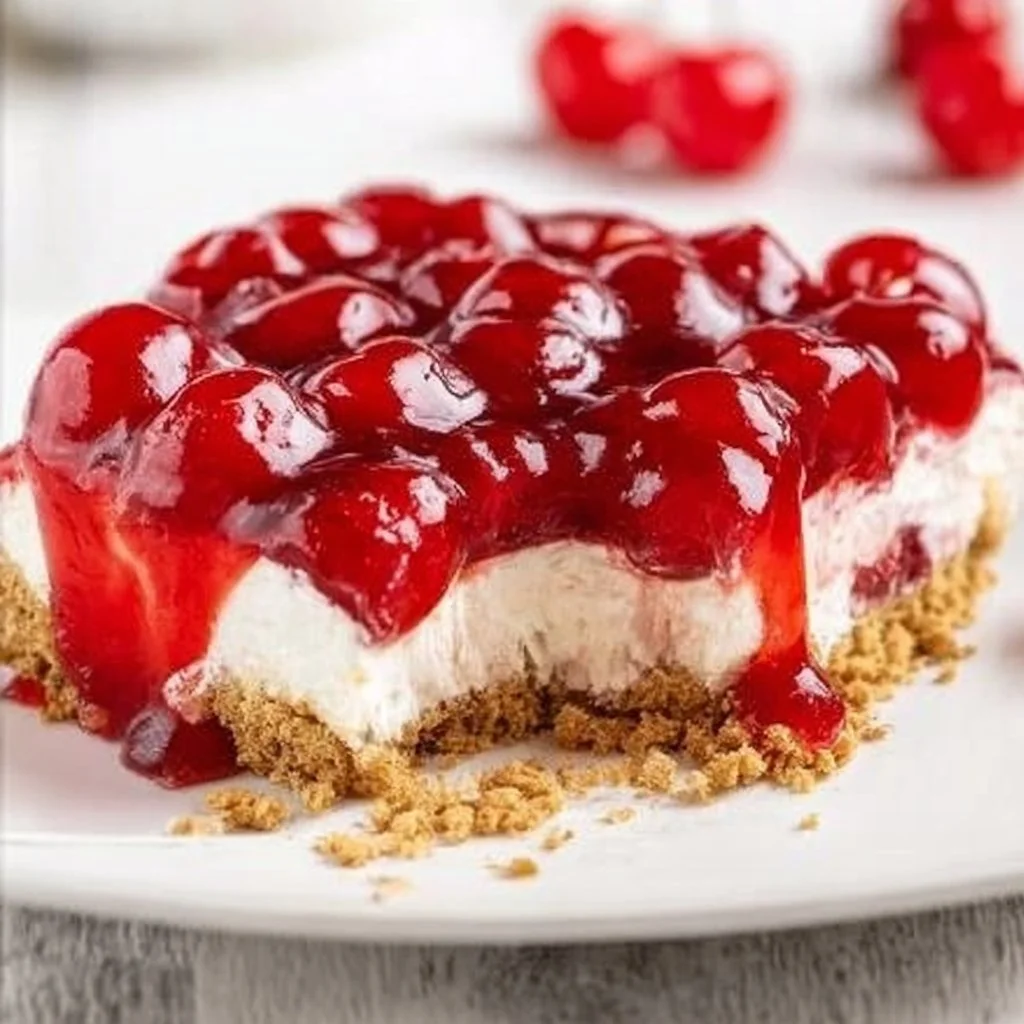
I first made this cherry delight the summer my neighbor Jean brought a plate to a block party. It’s one of those effortlessly charming desserts — bright cherry topping, a cream-cheese layer that tastes like quick cheesecake, and a crisp graham base. It’s great when you want something that looks special without fuss: potlucks, holiday tables, or a last-minute treat when cherries are on sale.
Why you’ll love this dish
This dessert hits a sweet spot: it’s familiar, fast, and crowd-friendly. The cream-cheese layer gives real cheesecake flavor without the long bake, and a glossy cherry topping makes it look like you slaved over it. It’s also:
- Quick to assemble (no oven required if you make a pressed crust).
- Budget-friendly — pantry staples plus one can of cherry pie filling.
- Kid- and potluck-approved — people of all ages tend to love it.
- Easy to scale up for parties.
How this recipe comes together
Think of this as a layered, no-bake cheesecake: a buttery graham crust pressed into a pan, a whipped cream-cheese middle, and a glossy cherry topping. The quick timeline:
- Make and press the crust, chill to set.
- Beat softened cream cheese with powdered sugar and vanilla until smooth.
- Fold in whipped topping for light texture.
- Spread filling over crust, top with canned cherries, then chill at least 2 hours so slices hold. This overview helps you decide when to start (make it the day before for best results).
What you’ll need
- For the crust:
- 2 cups graham cracker crumbs (about 10–12 full sheets)
- 6 tablespoons unsalted butter, melted
- 2 tablespoons granulated sugar (optional)
- For the filling:
- 8 ounces cream cheese, softened to room temperature
- 1 cup powdered sugar, sifted if lumpy
- 1 teaspoon vanilla extract
- 8 ounces whipped topping (Cool Whip) or equivalent homemade stabilized whipped cream
- For the topping:
- 1 (21-ounce) can cherry pie filling (or two 12–14 oz cans)
Notes/substitutions:
- If you prefer a store-bought shortcut, use a prebaked graham crust or vanilla wafer crust.
- For a lighter version, swap half the cream cheese with full-fat Greek yogurt, but expect a slightly looser set.
- Fresh cherry topping works (see Variations), but it requires a simple glaze to mimic pie filling.
Step-by-step instructions
- Prepare the crust: Combine graham crumbs, melted butter, and sugar. Press evenly into the bottom of a 9×13-inch pan (or into a 9-inch springform for taller slices). Chill 10–15 minutes to firm.
- Make the filling: Beat softened cream cheese in a bowl until smooth. Add powdered sugar and vanilla; beat until fluffy. Gently fold in whipped topping with a rubber spatula until homogenous and light.
- Assemble: Spread the cream-cheese mixture over the chilled crust in an even layer.
- Add cherries: Spoon the cherry pie filling over the cream layer. Spread carefully to keep layers neat.
- Chill: Cover and refrigerate at least 2 hours, preferably 4, for the filling to set. Overnight is best for clean slices.
- Serve: Use a sharp, hot knife (dip in hot water and wipe dry between cuts) to make neat squares. Garnish as desired and enjoy.
Keep directions short and active; move step-by-step and check the filling texture as you fold so you don’t deflate it.

01Ingredients
For the crust
For the filling
For the topping
02Method
- Prepare the crust
- Make the filling
- Assemble
- Chill
- Serve
Tap a step when it's done. The next one lights up.
0 OF 7 DONE03Recipe notes
- 01If using fresh cherries, a glaze is recommended to prevent the topping from becoming soggy. Can be made a day in advance for improved flavor.
How did it turn out?
No ratings yet. Tap a star to be the first.
Snap a photo and tag @recipe_smoke1 so I can see how yours came out.
Best ways to enjoy it
- Plate small squares on dessert plates and garnish with toasted almond slivers or a sprig of mint.
- Serve with espresso, a late-harvest pear spritzer, or lightly sweet sparkling white grape juice.
- For summer brunches, pair a slice with fresh berries and a dollop of plain Greek yogurt for contrast.
- Make individual jars for picnics: press crumbs into the bottom, layer filling, then cherries for portable charm.
How to store & freeze
Refrigeration: Keep covered with plastic wrap or a tight lid. It will stay best for 3–4 days. Cream-cheese desserts should not be left at room temperature for more than 2 hours.
Freezing: You can freeze uncut slices for up to 1 month. Wrap tightly in plastic plus foil to avoid freezer burn. Thaw in the refrigerator overnight before serving. Note: texture of whipped topping may change slightly after freezing.
Safety: If you made substitutions with fresh dairy (homemade whipped cream, fresh fruit), prioritize refrigeration and consume within 48–72 hours.
Creative twists
- Lemon-cherry: Add 1 teaspoon finely grated lemon zest to the filling for a brighter finish.
- Nutty crunch: Mix 1/2 cup chopped toasted pecans into the crust for extra texture.
- Mixed berries: Substitute cherry pie filling with blueberry or mixed berry pie filling.
- Lighter/diet swaps: Use low-fat cream cheese and lightly sweetened whipped topping; reduce powdered sugar to taste.
- Fresh cherry glaze: Cook 2 cups pitted fresh cherries with 1/4 cup sugar and 1 tablespoon cornstarch + 1/4 cup water until thickened for a fresher topping.
Your questions answered
Can I make this ahead for a party?
Yes — make it a day ahead and refrigerate. Overnight chilling yields the best slices and flavor melding.
Can I use fresh cherries instead of canned pie filling?
Yes, but fresh cherries need a glaze (cornstarch and sugar cooked briefly) or they’ll release juice and make the top soggy quickly. Use fresh-cherry topping the same day you serve.
Is Cool Whip necessary?
No. Stabilized whipped cream works great and tastes fresher. Cool Whip is convenient and gives consistent texture.
Can I convert this to a gluten-free dessert?
Absolutely. Use gluten-free graham crumbs or substitute almond flour mixed with a little melted butter for the crust.
How do I keep the crust from getting soggy?
Press it firmly and chill well before adding the filling. For extra protection, lightly brush an egg-white wash and bake the crust 5–6 minutes (only if using an oven) — this seals crumbs.
Conclusion
If you enjoy quick, no-bake fruit desserts with a cheesecake-like filling, you might also like this take on a classic fruit pie from strawberry-rhubarb pie, improved – Smitten Kitchen.
 Dessert
 Dessert
 Dessert
