Fudgy Red Velvet Brownies
These fudgy red velvet brownies offer a chewy, cocoa-rich interior and a glossy, crackled top, achieving the perfect balance of cocoa bitterness and sweetness.

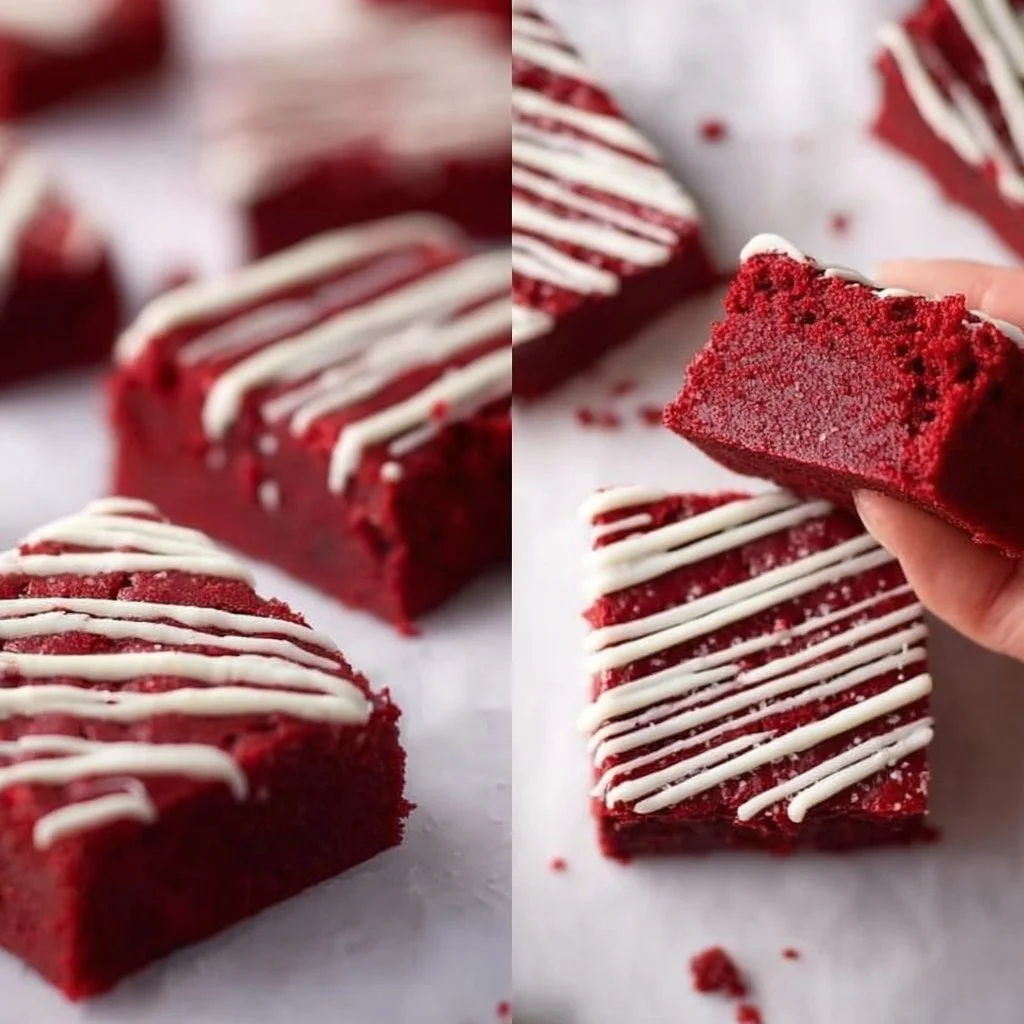
The crackled top gives way to a dense, almost molten interior—deep cocoa notes wrapped in a subtle cocoa-acid tang and the faint vanilla lift. These fudgy red velvet brownies sit between a brownie and a compact cake: the butter and eggs build a tender, chewy matrix while the cocoa and a bold hit of red create that unmistakable red-velvet profile. This is the kind of bake that rewards attention to simple technique.
What gives this dish its depth
This recipe leans on a few clear building blocks for depth: melted butter for shine and chew, whole eggs for structure and richness, and unsweetened cocoa for bittersweet backbone. With only a cup of flour, the batter stays dense rather than cakey; sugar and eggs create the glossy crust, while a controlled bake keeps the center fudgy.
Why this version works:
- Melted butter dissolves sugar efficiently and creates a uniformly tender crumb.
- Minimal flour means less gluten development, which keeps the interior dense.
- Cocoa powder supplies chocolate intensity without overpowering; the single tablespoon of red food coloring gives the brownies their signature hue without altering texture.
- Baking powder adds just enough lift to prevent an overly compact chew while retaining fudginess.
For more red-velvet ideas and inspired presentations, see this two-tone approach to cupcakes that leans on color and texture contrast: Two-Tone Rose Red Velvet Cupcakes.
How the flavor-building process
Start with technique: gently melting the butter and mixing it with sugar builds a glossy, cohesive base that traps air when eggs are added—this is partly why you get the shiny top. Adding the dry ingredients last prevents overmixing and keeps gluten formation in check. The cocoa introduces bitter notes that the sugar and vanilla balance; if you add walnuts or chocolate chips, they become textural punctuation points in each bite.
Step-by-step the flavors develop as follows:
- Butter + sugar create the tender foundation.
- Eggs and vanilla add richness and aromatics.
- Cocoa and a small amount of leavening control density and crumb.
- A short, controlled bake preserves moistness while forming a thin crust for contrast.
The flavor essentials
What you’ll gather for this dish (notes in parentheses):
- 1 cup all-purpose flour
- 1/2 cup unsweetened cocoa powder
- 1 cup granulated sugar
- 1/2 cup unsalted butter, melted
- 2 large eggs
- 1 teaspoon vanilla extract
- 1 tablespoon red food coloring
- 1/2 teaspoon baking powder
- 1/4 teaspoon salt
- 1/2 cup chopped walnuts or chocolate chips (optional)
Notes:
- Use unsweetened cocoa powder for clean chocolate bitterness; Dutch-processed will darken flavor and color slightly.
- Gel food coloring concentrates color without adding excess liquid; if you use liquid food coloring, the difference is minor but gel is more efficient.
- Optional mix-ins add texture—walnuts bring a nutty counterpoint, while chips add pockets of melted chocolate.
How to cook it from start to finish
Step-by-step directions you can trust:
- Preheat your oven to 350°F (175°C) and grease a 9×9 inch baking pan.
- In a medium bowl, mix together the flour, cocoa powder, baking powder, and salt.
- In another bowl, combine the melted butter and sugar until well blended.
- Add the eggs, vanilla extract, and red food coloring to the butter mixture and blend until smooth.
- Gradually add the dry ingredients to the wet ingredients and mix until combined.
- Fold in chopped walnuts or chocolate chips if desired.
- Pour the batter into the prepared baking pan and spread evenly.
- Bake for 25–30 minutes, or until a toothpick inserted into the center comes out with a few moist crumbs.
- Let cool before cutting into squares and serving.
Practical timing: check at 22–24 minutes if your oven runs hot; you want the center to be set but still moist. Overbaking is the most common way to lose fudginess.
01Ingredients
Dry Ingredients
Wet Ingredients
Optional Mix-ins
02Method
- Preparation
- Baking
Tap a step when it's done. The next one lights up.
0 OF 9 DONE03Recipe notes
- 01Check at 22–24 minutes if your oven runs hot; you want the center to be set but still moist. Overbaking is the most common way to lose fudginess.
How did it turn out?
No ratings yet. Tap a star to be the first.
Snap a photo and tag @recipe_smoke1 so I can see how yours came out.
Ways to enjoy it at its best
Serving ideas:
- Warm square with a scoop of vanilla ice cream for temperature contrast and mellow creaminess.
- Light cream cheese frosting or a simple cream-cheese dollop to introduce tang that cuts the sweetness.
- Espresso or a robust black coffee pairs well—the bitterness of coffee complements the cocoa.
- For a pretty presentation, dust lightly with cocoa or powdered sugar and add a few toasted walnut halves.
If you prefer handheld treats, these brownies slice well for boxed gifts or picnic platters; wrap individually to retain moisture.
How to store without losing flavor
Short-term:
- Room temperature: store in an airtight container for up to 3 days. Place parchment between layers to prevent sticking.
- Refrigeration: if you add cream cheese frosting, refrigerate and consume within 4–5 days. Bring to room temperature before serving to soften the texture.
Long-term:
- Freezing: wrap squares individually in plastic wrap and place in a freezer bag for up to 3 months. Thaw overnight in the fridge, then bring to room temperature or warm briefly in a low oven.
Reheating:
- Microwave a single square for 8–12 seconds to revive the fudgy interior (avoid overheating).
- In the oven, reheat at 300°F (150°C) for 6–8 minutes for a more even warmth without drying.
Ways to enhance the flavor
Practical notes from experience:
- Don’t overmix once the dry ingredients hit the wet mix; stir until just combined to avoid toughness.
- Let the melted butter cool slightly before combining with eggs to avoid cooking them.
- If you like a tangier profile, a teaspoon of vinegar or 2 tablespoons of buttermilk will emulate classic red velvet acidity without changing the method significantly.
- For deeper chocolate flavor, fold in 2 tablespoons of dark cocoa or swap half the sugar for brown sugar to add molasses notes.
For a playful textural combo—think cookie bark meets brownie—try pairing these squares with crisp, white-chocolate shards inspired by a simple four-ingredient bark: 4-Ingredient Cookie Dough Bark.
Flavor paths you can explore
Variations:
- Cream-cheese swirl: drop spoonfuls of sweetened cream cheese on top of the batter and swirl before baking.
- Double chocolate: stir in 1/3 cup finely chopped chocolate to the batter for pockets of melted chocolate.
- Nut-free: omit walnuts and add toasted seeds or extra chocolate chips.
- Intensified red: use concentrated gel food coloring for a deeper hue without extra moisture.
Small swaps—like brown sugar for part of the granulated sugar—will alter chew and flavor in predictable ways you can use to tailor the brownies.
What cooks usually ask
Practical answers to common concerns:
Why are my brownies cakey?
A: Likely too much flour, overmixing, or overbaking. Measure flour by spoon-and-level, mix until just combined, and remove when a toothpick shows moist crumbs.
Can I use cocoa nibs or chopped chocolate instead of chips?
A: Yes; chopped chocolate melts into pockets that are richer than chips. Nibs add texture and bitter crunch.
Will the red food coloring affect texture?
A: Liquid coloring in tablespoon amounts does add a small amount of moisture; gel coloring is preferable if you want intense color with minimal liquid.
Can I halve the recipe?
A: Yes—halve all ingredients and bake in a smaller (approx. 8×8 or loaf) pan, checking bake time earlier.
Conclusion
For more ideas, check out Fudgy Red Velvet Brownies – MikeBakesNYC and my Red Velvet Brownies.
 Dessert
 Dessert
 Dessert
