Red Velvet Cake Balls
Delicious red velvet cake balls with a cream cheese frosting center, coated in white chocolate for a perfect treat.

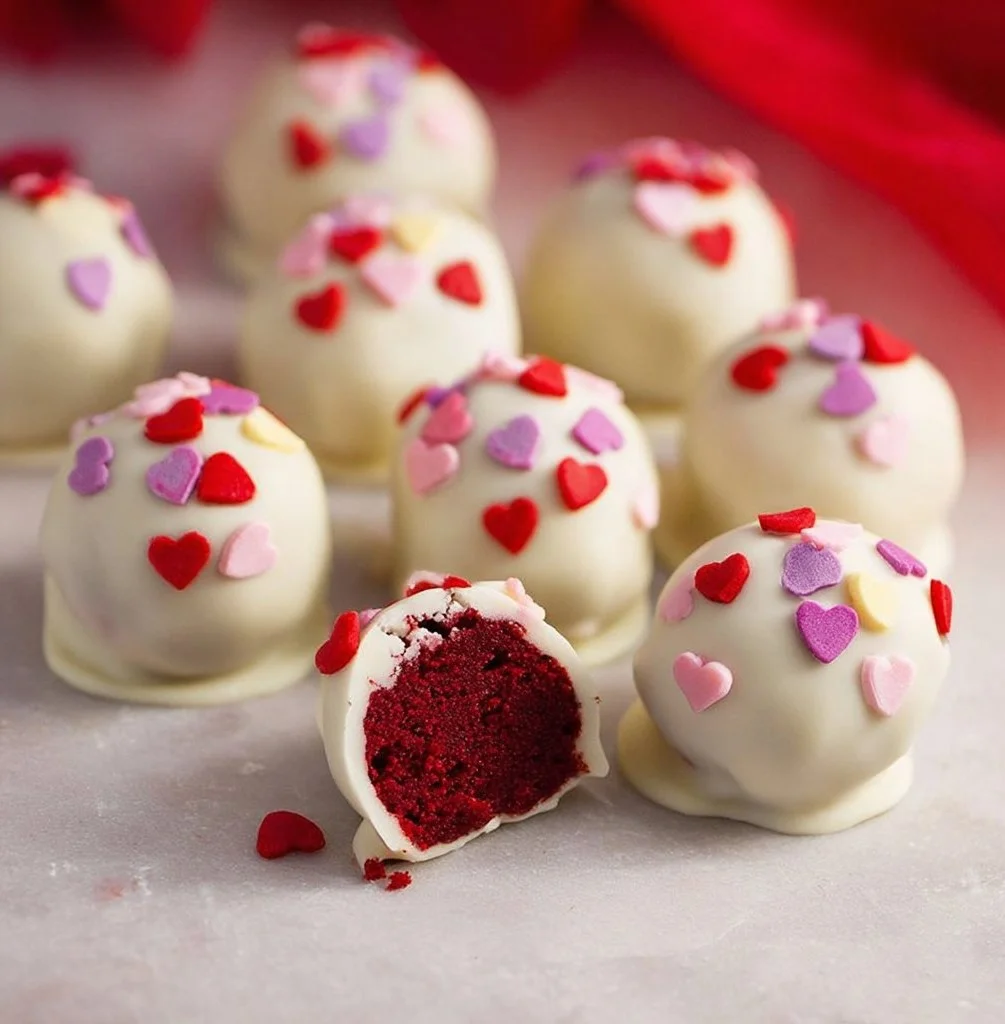
The warm, tangy smell of cream cheese meets a soft, cocoa-tinged crumb, then snaps into a smooth shell of white chocolate — small, effortless bites that still manage to feel composed. These cake balls concentrate red velvet’s subtle cocoa and buttermilk notes into a handheld finish that’s as welcome on a weekday counter as it is at a holiday spread.
Want a different red-velvet presentation? Try these two-tone rose red velvet cupcakes for a fancier showpiece.
What gives this dish its depth
Red velvet cake balls work because they compress well-balanced flavor into a compact texture. The cake provides an earthy cocoa base and a moist, slightly tangy structure (especially if you follow the box directions that call for buttermilk or vinegar). The cream cheese frosting brings brightness and fat that binds crumbs into a malleable filling. A white chocolate coating adds snap, sweetness, and a clean surface for sprinkles or cocoa dust.
When the components are measured and handled deliberately — fully cooled cake, chilled mixture before dipping, careful chocolate melting — you get consistent texture and flavor every batch. These are reliable results you can execute without fuss.
The flavor-building process
Start by developing moisture and flavor in the cake so the crumbs aren’t dry. The frosting doesn’t just sweeten — it reintroduces fat and acidity, smoothing the crumb into a cohesive ball. Chilling firms the interior so the coating adheres cleanly without cracking. The final white chocolate layer acts as both contrast (sweet and creamy) and structure (protecting the soft center).
This stepwise focus on moisture, bind, chill, and seal is what makes the texture pleasant: not crumbly, not soggy, just dense and tender.
The flavor essentials
What you’ll gather for this dish (notes included)
- 1 box red velvet cake mix — follow package liquids; for best flavor use buttermilk if recommended.
- 1/2 cup cream cheese frosting (homemade or store-bought) — cream cheese frosting contributes tang and moisture; adjust quantity slightly if your cake is very dry or very moist.
- 1 cup white chocolate chips — look for a quality brand labeled “white chocolate” rather than “coating” for smoother finish; add a teaspoon of neutral oil if needed to thin.
- Sprinkles (optional) — choose fine nonpareils for best adhesion; press on immediately after dipping.
If you’re exploring thematic presentations, these cake balls pair visually and flavor-wise with creative cupcake themes like blood-splattered Halloween cupcakes.
How to cook it from start to finish
Step-by-step directions you can trust
- Prepare the red velvet cake mix according to package instructions and bake in a 9×13 inch pan. Use the pan size called for on the box; an even bake gives predictable crumbs.
- Allow the cake to cool completely, then crumble it into a large bowl. Cool fully to room temperature — warm crumbs will make the mixture too soft.
- Add the cream cheese frosting to the crumbled cake and mix until well combined. Use a sturdy spatula or clean hands; the goal is an even, pliable mixture that holds shape when squeezed.
- Roll the mixture into small balls and place them on a baking sheet. Aim for 1–1.25 inch balls for consistent dipping and serving.
- Chill the cake balls in the refrigerator for at least 30 minutes. This firms the interior so the coating won’t crack or cause the balls to fall apart.
- Melt the white chocolate chips in a microwave or double boiler. Microwave in 15–20 second bursts, stirring between each; stop when mostly melted and finish stirring to avoid overheating.
- Dip each cake ball into the melted chocolate, allowing excess to drip off. Use two forks or a dipping tool for clean handling. Work quickly but carefully — keep the chocolate warm and fluid.
- Place the dipped cake balls back on the baking sheet and sprinkle with additional toppings if desired. Apply sprinkles immediately, before the coating sets.
- Let them set at room temperature or in the fridge until firm. Room temp gives a glossier finish; refrigerator sets faster and is useful in warm kitchens.

01Ingredients
For the cake
For the filling
For the coating
02Method
- Preparation
- Coating
Tap a step when it's done. The next one lights up.
0 OF 9 DONE03Recipe notes
- 01Serve chilled for best flavor; can store in an airtight container in the refrigerator for 2-3 days or freeze for up to 2 weeks.
How did it turn out?
No ratings yet. Tap a star to be the first.
Snap a photo and tag @recipe_smoke1 so I can see how yours came out.
Serving this dish
Ways to enjoy it at its best
- Serve chilled or just off-chill: slightly cold centers contrast nicely with the white chocolate. If serving at a party, remove from fridge 10–15 minutes beforehand to soften slightly.
- Present on a platter with paper liners or on skewers for easy grab-and-go. Arrange by color or sprinkle type for visual contrast.
- Pair with coffee (espresso cuts through the sweetness) or a dry sparkling white grape juice (cleanses the palate). For kid-friendly events, a cold glass of milk is a natural counterpoint.
How to store without losing flavor
Keeping leftovers in good shape
Short term (2–3 days): store in an airtight container in the refrigerator in a single layer separated by parchment. Colder storage keeps cream cheese centers safe and texture intact.
Medium term (up to 2 weeks): freeze on a tray until solid, then transfer to a sealed container or freezer bag. Thaw in the refrigerator overnight before serving.
Avoid keeping them at room temperature for more than a few hours if your frosting contains real cream cheese — the filling is perishable.
Reheating that maintains texture: bring refrigerated cake balls to room temperature for about 10–20 minutes before serving; avoid microwave reheating as it will soften the coating and may make the interior overly soft.
Practical notes from experience
Small adjustments that improve the dish
- Use well-cooled cake: any residual heat makes the mixture too soft and requires extra chilling.
- Control ball size for uniform coating: larger balls need longer to firm and are trickier to dip without cracking.
- Keep your chocolate warm but not hot: overheated white chocolate seizes and can become grainy. If it’s tight, stir in a half teaspoon of vegetable oil or coconut oil to smooth it.
- Work in batches: dip 8–12 balls at a time so the chocolate stays fluid and you can finish with toppings before the surface sets.
Flavor paths you can explore
Ingredient swaps that still work
- Swap white chocolate for dark chocolate: it brightens the cocoa base and reduces sweetness.
- Add 1–2 teaspoons of finely grated orange zest to the mixture for a citrus lift that complements white chocolate.
- Make frosting from scratch (cream cheese, powdered sugar, vanilla) for cleaner flavor control — homemade frosting lets you dial acidity.
- For sturdier coatings in warm conditions, use candy melts or tempered chocolate.
What cooks usually ask
Practical answers to common concerns
My balls fall apart while dipping — why?
A: Likely the interior is too warm or too loose. Chill them longer (30–60 minutes), or add slightly more frosting to bind. Keep the chocolate fluid but not hot to avoid melting the interior.
White chocolate seized or got grainy — can I fix it?
A: If the chocolate is only slightly tight, stir in a small amount (1/2–1 tsp) of neutral oil. If it’s seized from moisture, best to start fresh — strained or seized chocolate won’t smooth properly.
Can I make these ahead?
A: Yes — freeze fully set balls for up to 2 weeks. Thaw overnight in the fridge before serving.
Conclusion
For a clear technique reference and visual cues while you work, this Chocolate with Grace guide on Red Velvet Cake Balls – Chocolate with Grace is a useful companion. For a different spin, try my Strawberry Red Velvet Cake.
 Dessert
 Dessert
 Dessert
