Valentine’s Day Chocolate Bark
A delightful and colorful dessert bark featuring layers of semi-sweet chocolate, creamy white chocolate, and vibrant pink candy melts, topped with festive sprinkles for a crunchy finish.

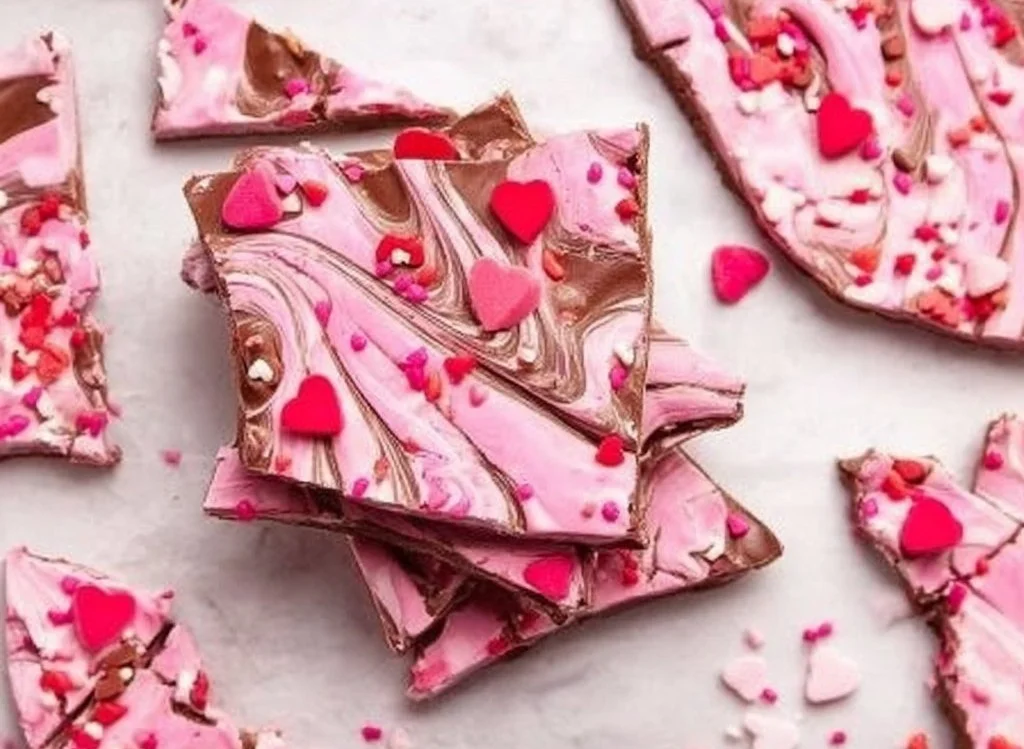
Glossy pools of dark chocolate set against ribbons of creamy white and a whisper of pink — this bark is all about contrast: bitter-sweet cocoa, milky sweetness, and a crunch of festive sprinkles that snaps when you bite. It’s an immediate, uncomplicated dessert to make when you want something that looks deliberate and tastes like you paid attention.
4-ingredient cookie dough bark is a different direction if you want another no-fuss sweet, but for a bright, chocolate-forward Valentine’s treat, this bark keeps the focus on clean chocolate flavor with a playful finish.
How the flavors come together naturally
The backbone here is semi-sweet chocolate: it gives the bark structure and cocoa depth. The white chocolate softens the bite and adds creamy vanilla notes. Pink candy melts are primarily visual, but they also add a light, sweet coating that helps the bark feel celebratory without changing the chocolate’s character. The sprinkles deliver texture and a burst of sugary interest on the final bite.
Why this recipe works: the method keeps each chocolate distinct long enough to make attractive swirls but melts them sufficiently so they fuse into a stable bark. There’s no need for full tempering here; a shallow, quick set avoids bloom while using straightforward microwave technique most cooks already trust.
The flavor-building process
- Start with a reliable semi-sweet chocolate (around 55–65% cocoa) so the bark has real cocoa presence without excessive bitterness.
- Melt and spread the base layer thin enough to set quickly yet thick enough to hold a bite.
- Layer white chocolate and colored candy melts as accents — not as a full second layer — so they marble with the base rather than sitting in discrete slabs.
- Swirl gently to create veins of flavor rather than blending everything into a single homogeneous mass.
- Finish with sprinkles while the top is tacky so they adhere and retain crunch.
This stepwise approach preserves distinct tastes and textures: chocolate weight, creamy sweetness, visual pop.
The flavor essentials
What you’ll gather for this dish — focused ingredients that shape the taste:
- Semi-sweet chocolate chips (10–12 oz). Choose chips or chopped chocolate with 55–65% cocoa for balanced depth.
- White chocolate chips (6–8 oz). Look for couverture-style or chips labeled “real white chocolate” rather than confectionery coating for best flavor.
- Pink candy melts (3–4 oz). These are primarily for color; they melt easily and hold their hue.
- Valentine’s sprinkles (2–3 tbsp). A mix of nonpareils, jimmies, and heart-shaped sprinkles gives visual and textural interest.
Small notes on quality: higher-fat chocolates melt smoother and produce a glossier bark. If you prefer less sweetness, reduce the white chocolate quantity slightly and accent with a light sprinkle of flaky sea salt at the end.
How to cook it from start to finish
Practical steps to get the right texture:
- Line a baking sheet with parchment or a silicone mat. Warm pan will help spread the chocolate evenly.
- Place semi-sweet chocolate chips in a microwave-safe bowl. Microwave at 50% power, stirring every 30 seconds, until almost melted, then stir until smooth. (Avoid overheating — residual heat finishes the melt.)
- Pour and spread the melted semi-sweet chocolate into an even layer about 1/8–1/4 inch thick.
- In a separate bowl, melt the white chocolate chips the same way: microwave at 50% power in 30-second bursts, stirring between intervals.
- Melt the pink candy melts in a third bowl (or melt the candy melts for shorter bursts since they’re formulated to soften quickly).
- Drizzle the white chocolate and then the pink candy melts over the semi-sweet base in thin streams.
- Use a toothpick or skewer to gently drag through the drizzles, creating a marbled pattern — don’t overwork or the colors will blend to brown.
- Immediately sprinkle the Valentine’s sprinkles over the still-tacky surface so they adhere.
- Let the bark cool at room temperature until fully set (about 1–2 hours) or place in the refrigerator for 20–30 minutes to speed setting. Break into irregular pieces and enjoy.
Technique notes: stirring every 30 seconds in the microwave prevents seizing. If you prefer, use a double boiler for greater temperature control — especially useful with white chocolate.
01Ingredients
Base Ingredients
02Method
- Preparation
- Assembly
- Cooling
Tap a step when it's done. The next one lights up.
0 OF 10 DONE03Recipe notes
- 01Store in an airtight container; lasts up to 1 week at room temperature, 2-3 weeks in the refrigerator, or 3 months in the freezer. Avoid storing near strong odors.
How did it turn out?
No ratings yet. Tap a star to be the first.
Snap a photo and tag @recipe_smoke1 so I can see how yours came out.
Ways to enjoy it at its best
- Stack a few pieces on a small dessert plate for an elegant after-dinner treat.
- Chop into small shards to rim a dessert glass or for sprinkling over whipped cream.
- Pair with a bold coffee or a citrus-forward sparkling water to cut through the sweetness.
- For a simpler snack plate, arrange alongside shortbread or plain cookies so the chocolate bark is the star without competing flavors.
If you’re assembling a dessert board, consider including a denser chocolate element like chocolate cherry brownies to contrast the light, crisp bark.
How to store without losing flavor
Keeping leftovers in good shape:
Short-term: store in an airtight container at cool room temperature (60–70°F) away from direct light and strong odors for up to 1 week.
Refrigeration: place pieces in a single layer between parchment sheets in an airtight container if your kitchen is warm; they’ll last 2–3 weeks but may develop slight condensation when returned to room temperature.
Freezing: wrap pieces in parchment and place in a freezer-safe bag for up to 3 months. Thaw in the refrigerator first to avoid moisture forming on the surface.
Avoid storing near fruits or onions — chocolate picks up odors easily. If you’re worried about bloom (a white film that can form when fats or sugars crystallize), store in a stable, cool environment and avoid rapid temperature swings.
Flavor paths you can explore
Ingredient swaps that still work:
- Dark chocolate (70%) base for a less sweet, more intense bark.
- Colored cocoa butter (painted with a pastry brush) instead of candy melts for a thinner, more professional-looking ribbon.
- Add-ins: toasted almonds, pistachios, freeze-dried strawberries, or crushed peppermint for texture and flavor contrast.
- Make it seasonal: switch sprinkles and candy melt colors to match other holidays or events.
The method is flexible — keep proportions similar and the visual result will remain striking.
What cooks usually ask
Practical answers to common concerns
Do I need to temper the chocolate?
A: Not for a thin bark like this. Tempering produces a more stable snap and sheen for molded chocolates, but here a quick set on a cool surface gives an attractive result without the extra steps.
Can I use chocolate chips labeled “baking”?
A: Yes, but consider adding a bit of neutral oil if the chips contain stabilizers and don’t become glossy when melted.
How do I prevent the colors from turning brown when swirling?
A: Keep the swirls light and use a gentle hand. Over-swishing blends the white and pink into the darker base and loses the marbled look.
What’s the best way to break the bark?
A: Use your hands for natural shards or wrap the cooled sheet in a towel and hit gently with a rolling pin for uniform pieces.
Conclusion
For more ideas on creative bark presentations and layered techniques, see this Sweetheart Swirl Bark from Sally’s Baking, which explores similar marbling methods.
 Keto Desserts
 Dessert
 Dessert
