Valentine’s Day Oreo Pops Recipe
Delightful chocolate-covered Oreo pops with a creamy center, perfect for gifting and special occasions.

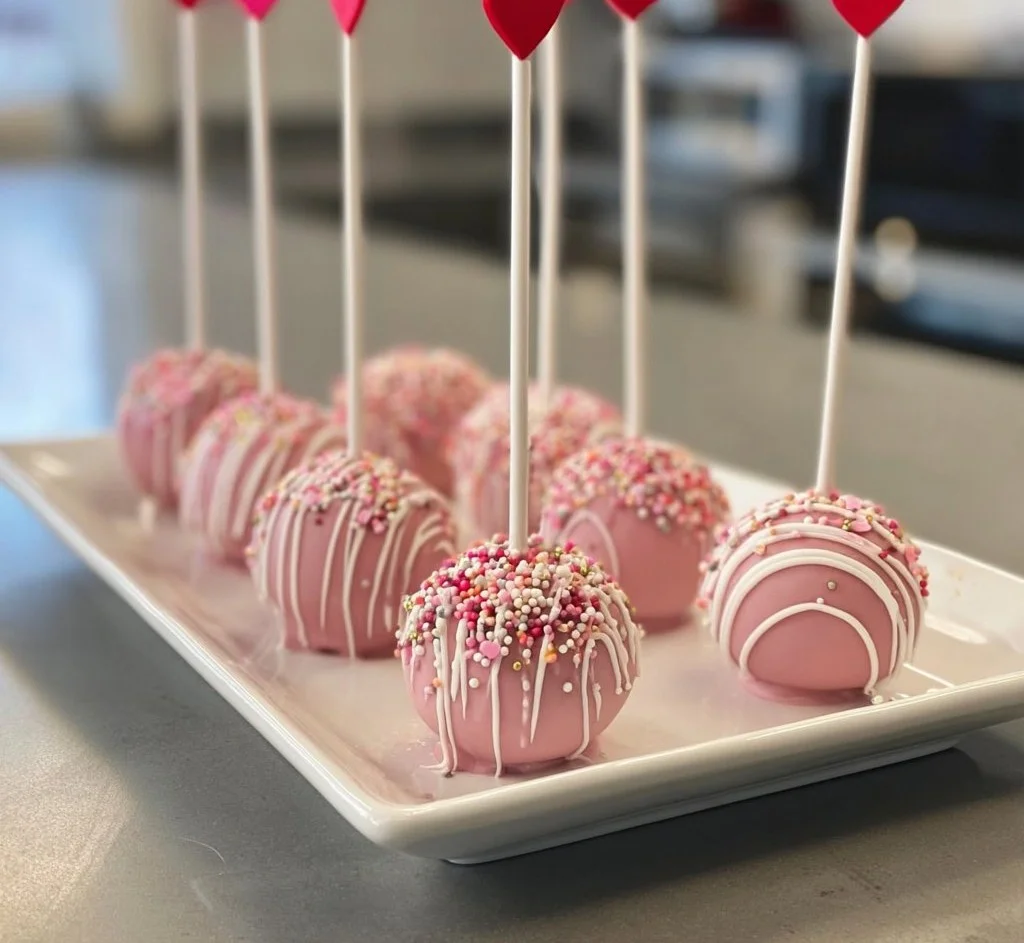
The snap of chocolate, the cool cream of an Oreo, the way a smear of pink drizzle reads like a small, deliberate indulgence — these pops balance texture and sweetness instead of shouting for attention. They’re a quick way to make a familiar cookie feel deliberate and giftable: crisp cookie exterior, dense cream center, and two layers of tempered chocolate that set with a satisfying bite.
For simple dessert presentation ideas that pair well with these pops, see this go-to vanilla cake write-up.
How the flavors come together naturally
This treat relies on contrast. A classic Oreo provides a bittersweet cocoa note and firm crunch; white chocolate adds creamy sweetness and a vanilla-leaning richness; the milk or dark coating brings roast, cocoa depth, and a cleaner snap. When you press the stick into the cream and reassemble the cookie, the cream acts as a natural adhesive and flavor bridge — it keeps the cookie halves glued while contributing a neutral, sweet center that lets the chocolate coatings shine.
Technically, you’re building three layers of flavor: cookie (bitter/cocoa), cream (sweet/neutral), and chocolate shell (sweet/deep). That layering is what makes each bite feel complete rather than cloying.
The flavor-building process
- Create a secure core — the Oreo with a lollipop stick — so the pop stays intact during dipping.
- Chill briefly to firm the cream and minimize cookie crumble when dunking.
- Melt two chocolates separately and work quickly: a white base for brightness and a milk/dark outer coating for contrast.
- Decorate while the coating is wet to trap sprinkles and any decorative drizzle.
- Let the shell set fully so texture and snap are preserved.
This stepwise approach ensures the cookies keep their structure and that the coatings don’t become grainy or streaky from overheating.
Ingredient lineup with notes
- 12 Oreo cookies — classic sandwich cookies work best; double-stuff is okay but gives thicker centers.
- 1 cup white chocolate chips or white candy melts — candy melts are forgiving; real white chocolate has richer flavor.
- 1 cup milk or dark chocolate chips or candy melts — choose dark for less sweetness and clearer chocolate flavor.
- 12 lollipop sticks — sturdy sticks prevent wobble; wooden or plastic both work.
- Valentine’s Day sprinkles — small, flat sprinkles or nonpareils adhere best.
- Red or pink candy melts — for drizzle and visual contrast.
For more of the author’s recipe notes and background, visit the author page.
Step-by-step directions you can trust
- Carefully twist each Oreo apart so the cream stays mostly on one half. Work slow and steady to avoid shattering the cookie.
- Insert a lollipop stick into the cream side of each Oreo. If the cream resists, remove a tiny bit with a paring knife, then push the stick in. Add a dab (about 1/4 teaspoon) of melted chocolate to the center if needed to secure the stick, then place the other half back on and press gently.
- Place assembled pops on a parchment-lined tray and freeze for 5 minutes. This firms the cream and makes dipping cleaner.
- Melt white chocolate and milk/dark chocolate separately according to package directions. Microwave method: heat in 20–30 second bursts, stirring between each burst until smooth. Avoid overheating to prevent grainy texture.
- Hold a pop by the stick and dip it into the milk/dark chocolate (or dip in white first if you prefer that as the main shell), fully covering the cookie. Lift and allow excess to drip off for a few seconds.
- Place dipped pops back on parchment. Immediately decorate: press sprinkles into the wet chocolate or drizzle warmed red/pink candy melts over the top using a small piping bag or fork for fine lines.
- Let the pops set at room temperature (30–60 minutes) or refrigerate briefly (10–15 minutes) for faster setting. If refrigerating, bring to room temperature before serving to avoid condensation.
These directions prioritize temperature control and gentle handling — the two most common failure points for coated cookies.

01Ingredients
Main Ingredients
02Method
- Preparation
- Dipping and Decorating
- Setting
Tap a step when it's done. The next one lights up.
0 OF 10 DONE03Recipe notes
- 01Wrap individual pops in cellophane and tie with a ribbon for a tidy edible gift. Store in an airtight container at room temperature for up to 3 days.
How did it turn out?
No ratings yet. Tap a star to be the first.
Snap a photo and tag @recipe_smoke1 so I can see how yours came out.
Ways to enjoy it at its best
- Wrap individual pops in cellophane and tie with a ribbon for a tidy edible gift.
- Arrange on a flat platter with a low vase of flowers for a simple centerpiece.
- Pair with unsweetened tea or espresso to cut sweetness and highlight the chocolate notes.
- For a kid-pleasing arrangement, stand them upright in a shallow foam block hidden in a decorated box.
Serving them slightly cool preserves the chocolate snap; letting them warm too long softens both shell and cream.
How to store without losing flavor
Short term: Store in a single layer in an airtight container at room temperature for up to 3 days. Keep away from heat or sunlight.
Longer term: Refrigerate for up to 2 weeks, wrapped individually to avoid moisture transfer. Bring to room temperature before serving to recover texture.
Freezing: Freeze unwrapped pops on a tray until solid, then transfer to a sealed bag for up to 1 month. Thaw in the fridge overnight, then to room temperature to minimize condensation.
Avoid stacking while the chocolate is tacky, and don’t store near strong-smelling foods — chocolate absorbs odors.
Practical notes from experience
- Use real white chocolate if flavor matters; candy melts are easier to work with but can taste waxy. If using chips, add 1 teaspoon neutral oil (vegetable or coconut) per cup to make dipping smoother.
- Work in small batches: if melted chocolate sits too long, it thickens and becomes harder to dip.
- Maintain dry tools and bowls — any moisture can seize melted chocolate.
- If chocolate “seizes” (becomes grainy), gently warm and stir in 1/2 teaspoon vegetable oil at a time until smooth.
- For a professional finish, tap the dipped pop lightly on the edge of the bowl to remove drips, then rotate it once more to tidy the seam.
These small adjustments separate an amateur coating from a clean, restaurant-style finish.
Flavor paths you can explore
- Swap the milk/dark shell for dark chocolate and add a sprinkle of flaky sea salt for grown-up balance.
- Use flavored candy melts (strawberry or caramel) for a different visual and taste profile.
- Crush a few Oreos and press the crumbs into half of the wet coating for texture contrast.
- Turn them into truffles: after dipping, chill, then dip a second time to create a thicker shell.
All variations follow the same mechanical steps: secure the stick, chill briefly, dip, decorate, and set.
What cooks usually ask
Can I use homemade sandwich cookies?
A: Yes. Use a firm cream center; soft fillings may not secure the stick as well. Chill the filled cookie before inserting the stick.
How do I prevent the cookie from breaking when twisting apart?
A: Twist slowly and hold each half close to the seam. If it resists, warm your hands slightly — gentle warmth softens the cream enough to separate cleanly.
Should I temper the chocolate?
A: Tempering yields the best snap and sheen, but you can use untempered chocolate or candy melts for ease. For true tempering, follow a tempering guide or a reliable chocolate resource.
Can I prepare these a day ahead?
A: Yes — store in a cool, dry place in a single layer and wrap if gifting.
Conclusion
If you want additional inspiration or alternate presentations for Valentine-themed Oreo pops, consider this recipe roundup on Happiness is Homemade and another version with step-by-step photos on Urban Bliss Life. For more ideas, check out Valentine’s Day Oreo Pops – Happiness is Homemade and my Valentine’s Day Oreo Pops.
 Dessert
 Dessert
 Dessert
