Red Velvet Crinkle Cookies
These Red Velvet Crinkle Cookies are a delightful mix of texture and flavor, featuring a tender, fudgy center and a crackled, crisp exterior, perfect for any occasion.

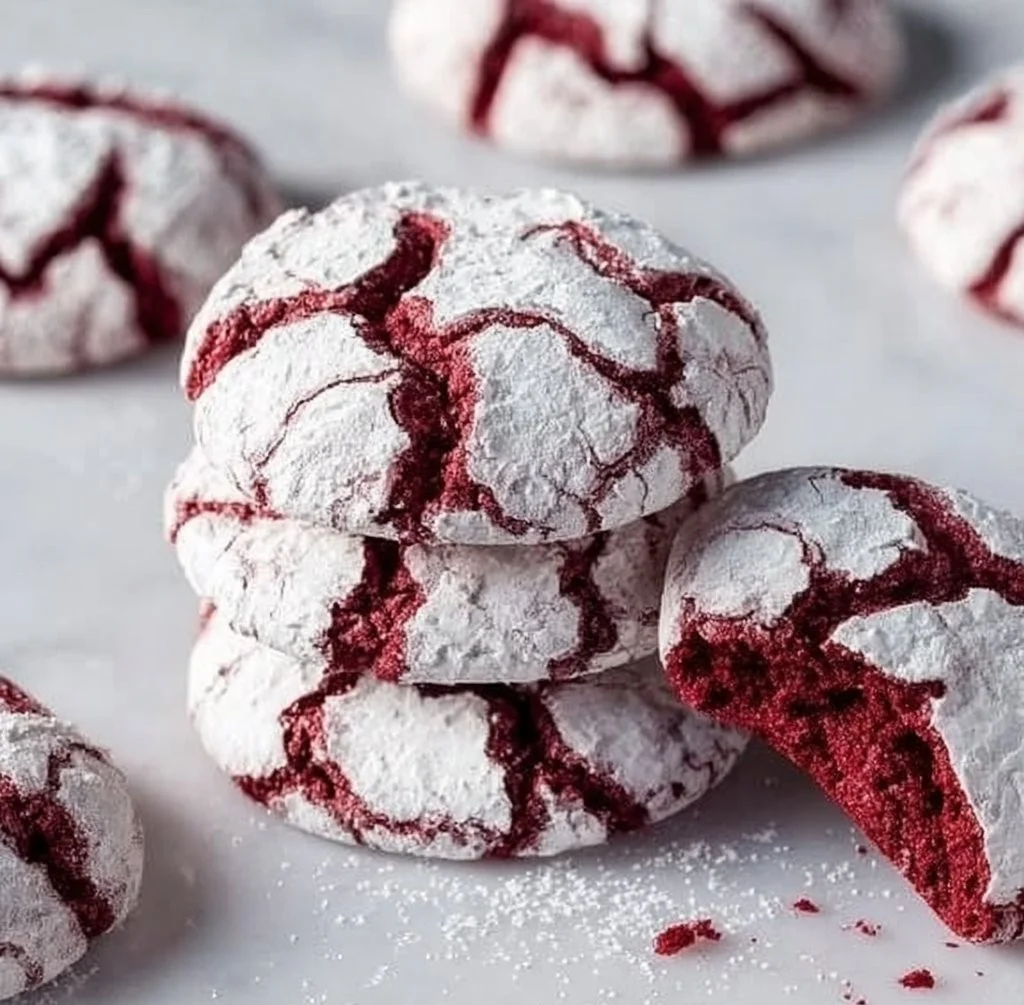
Autumn-light through the kitchen window, a faint tang of cocoa and a dusting of powdered sugar on your fingertips — these cookies land exactly where nostalgia meets careful technique. The red velvet crinkle cookie is velvet in texture, bright in color, and built on simple chemistry: a little cocoa to suggest chocolate, sugar and eggs for structure, and oil for a tender, slightly fudgy center. Make them once and you’ll notice how the crackled surface highlights the contrast between a thin crisp edge and a soft middle.
If you enjoy layered red velvet ideas, try our two-tone rose red velvet cupcakes for another way to use the same flavor profile.
Why this recipe earns a spot in your rotation
This recipe balances texture and color without relying on complex technique. Cocoa powder adds just enough chocolate flavor to make the cookie feel like red velvet rather than a plain sugar cookie dyed red. Using vegetable oil keeps the crumb moist and slightly tender, while chilling the dough limits spread so the sugar-coated exterior can fracture into the signature crinkles.
What gives this cookie its depth:
- The small amount of cocoa provides a faint roasted bitterness that prevents the red coloring from tasting artificially sweet.
- Eggs and sugar create structure and lift; baking powder ensures the cookies puff and then crack.
- Rolling in powdered sugar builds that contrast: the sugar sets on the surface and splits as the cookie expands.
The flavor-building process
Think of the recipe as three clear stages: dry flavor framing, wet emulsification, and controlled chilling/baking. First, the flour, cocoa, baking powder, and salt form the flavor backbone and leavening. Next, eggs, sugar, oil, vanilla, and food coloring emulsify into a glossy batter that traps air. Finally, chilling firms the dough so the heat of the oven produces top cracking while keeping the interior soft.
Step-by-step development:
- Combine dry flavor agents and aerating agents to ensure even distribution.
- Beat wet ingredients until cohesive — overmixing after adding flour tightens gluten and can toughen the cookie.
- Chill to firm the dough so cookies keep height and crack attractively rather than flattening.
What you’ll gather for this dish
The components that shape the taste:
- 2 cups all-purpose flour
- 1 cup granulated sugar
- 1/4 cup unsweetened cocoa powder
- 1 teaspoon baking powder
- 1/2 teaspoon salt
- 2 large eggs
- 1/2 cup vegetable oil
- 1 teaspoon vanilla extract
- 1 tablespoon red food coloring
- Powdered sugar for rolling
Notes on key ingredients:
- Cocoa powder: Dutch-processed will deepen color and mellow acidity; natural cocoa is brighter and slightly tangier.
- Vegetable oil: neutral flavor and tender crumb; swap for melted unsalted butter for more flavor but expect a firmer texture.
- Food coloring: gel or paste delivers richer color with less liquid. If you prefer natural options, beet powder works but changes flavor subtly.
Step-by-step directions you can trust
Practical steps to get the right texture:
- Preheat your oven to 350°F (175°C) and line baking sheets with parchment paper.
- In a medium bowl, whisk together flour, cocoa powder, baking powder, and salt.
- In a large bowl, mix eggs, sugar, vegetable oil, vanilla extract, and red food coloring until well combined.
- Gradually add the dry ingredients to the wet ingredients, mixing until just combined. Do not overmix.
- Chill the dough in the refrigerator for about 30 minutes to firm it for rolling.
- Scoop tablespoon-sized amounts of dough and roll into balls, then roll them in powdered sugar to coat.
- Place the balls on the prepared baking sheets about 2 inches apart.
- Bake for 10–12 minutes, or until the edges are set but the centers are still soft.
- Let cool on the baking sheets for a few minutes before transferring to wire racks to cool completely.
Technique tips within the steps:
- Use a small cookie scoop for uniform size; consistent portioning yields even baking.
- Don’t skip the chill — it makes the difference between pretty crinkles and flat disks.
- Watch the first batch closely; oven temps vary and you want edges set without drying the center.
01Ingredients
Dry Ingredients
Wet Ingredients
For Rolling
02Method
- Preparation
- Baking
Tap a step when it's done. The next one lights up.
0 OF 9 DONE03Recipe notes
- 01For serving, plate warm with a light dusting of extra powdered sugar. Pair with a creamy beverage like cold milk or a latte. Store cooled cookies in an airtight container for up to 4 days at room temperature. Long-term, freeze baked cookies for up to 3 months.
How did it turn out?
No ratings yet. Tap a star to be the first.
Snap a photo and tag @recipe_smoke1 so I can see how yours came out.
Ways to enjoy it at its best
Straightforward serving ideas:
- Plate warm with a light dusting of extra powdered sugar; the contrast between warm interior and crisp edge is most pronounced fresh from the oven.
- Pair with a creamy beverage: cold milk, a latte with a shot of espresso, or a lightly sweetened chai.
- For a more dessert-forward approach, split a cookie and spread a thin smear of cream cheese frosting or mascarpone between two cookies.
How to present naturally:
- Arrange in an offset stack so the crackled tops are visible.
- Serve on a neutral plate or parchment to let the deep red and white sugar pop.
How to store without losing flavor
Keeping leftovers in good shape:
Short-term: store cooled cookies in an airtight container at room temperature for up to 4 days. Place a sheet of parchment between layers to protect the crackled tops.
Longer-term: freeze baked cookies in a single layer on a tray until firm, then transfer to a freezer bag for up to 3 months. Thaw at room temperature; a few minutes in a 300°F oven will refresh the exterior.
Dough storage: form balls and freeze them on a tray, then move to a bag. Bake from frozen, adding 1–2 minutes to the bake time.
Reheating that maintains texture:
Warm individual cookies 6–8 seconds in the microwave or 3–5 minutes at 300°F to restore a crisp edge without overcooking the center.
Practical notes from experience
Small adjustments that improve the dish:
- If you prefer a chewier center, increase the scoop size slightly and shorten bake time by a minute.
- To strengthen the crackle pattern, roll the dough balls generously in powdered sugar and give them a brief extra chill after coating.
- Swap vanilla for a touch of almond extract (start with 1/4 teaspoon) for a different aromatic profile that pairs well with cocoa.
For a quick twist on texture or presentation, see this simple 4-ingredient cookie dough bark for inspiration on combining cookie dough textures in other desserts.
Flavor paths you can explore
Ingredient swaps that still work:
- Butter instead of oil: melt and cool before mixing; expect a slightly firmer, more flavorful cookie.
- Natural coloring: beet powder or concentrated beet juice — color will be less vibrant and add an earthy note.
- Filling: press a small indentation in unbaked balls and add a teaspoon of cream cheese mixture before baking for a filled version.
- Gluten-free: use a cup-for-cup gluten-free flour blend with xanthan gum if your blend doesn’t already contain it.
Adjustments for dietary preferences:
- Use maple syrup or honey? Not recommended without adjusting dry ingredients — these will alter moisture and spreading significantly.
- Reduce sugar? These cookies rely on sugar for structure and surface crinkle; minor reductions (up to 10%) are manageable but will change texture.
What cooks usually ask
Practical answers to common concerns:
Why didn’t my cookies crackle?
A: Most often the dough was too warm or the sugar coating too thin. Chill dough longer and roll generously in powdered sugar.
Can I use butter instead of oil?
A: Yes. Use melted and cooled unsalted butter. Cookies will be slightly less tender and more buttery-tasting; watch bake time.
My cookies spread too much. How to prevent that?
A: Chill longer, reduce oven temperature by 10–15°F if they brown quickly, and ensure your baking powder is fresh.
Can I make these without food coloring?
A: Yes — they’ll taste the same but won’t have the classic red hue. For natural color, beet powder is an option but expect a subtle flavor shift.
Conclusion
For more ideas, check out Red Velvet Crinkle Cookies – Broma Bakery and my Red Velvet Sugar Cookies. These resources offer complementary techniques and photos that can help you dial in appearance and bake timing.
 Keto Desserts
 Keto Desserts
 Keto Desserts
