Dilly Beans (Dill Pickled Green Beans)
Crunchy and tangy home-canned dill pickled green beans, perfect for adding flavor to meals or as pantry gifts.

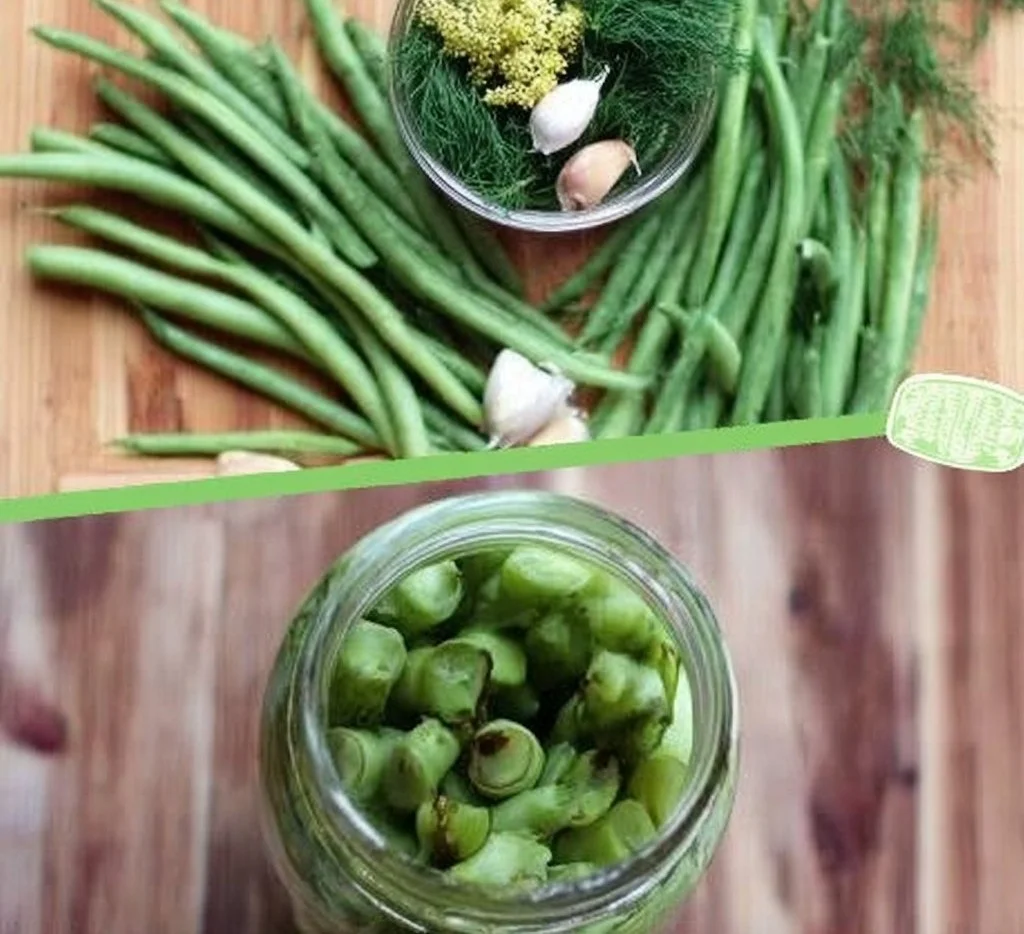
I’ve been making dilly beans every late summer since the backyard dill went wild. Crunchy, tangy, and just garlicky enough, home-canned dill pickled green beans are the kind of pantry stash that saves lunches and elevates a sandwich or charcuterie board. They’re also a ridiculously satisfying way to preserve a bumper crop of beans—and they make terrific gifts. If you like easy canning projects that reward you for months, this one’s for you. For an easy weeknight pairing idea, try them alongside a hearty skillet dinner like crockpot turkey kielbasa and green beans.
Why you’ll love this dish
Dilly beans are bright, crunchy, and full of summer flavor captured in a jar. They’re perfect for:
- Using up garden beans in one batch.
- Adding a low-calorie, high-flavor snack to salads and sandwiches.
- Creating shelf-stable pantry gifts for holidays and neighbor handouts.
They’re also budget-friendly: simple pantry staples plus dill and garlic turn into something gourmet. Make a batch before tomato season ends and you’ll be rewarded all winter.
How this recipe comes together
This is a straightforward hot-brine, water-bath canned pickle. In short:
- Sterilize pint jars and prepare lids.
- Trim and pack beans upright with dill heads and optional garlic/pepper.
- Heat a vinegar + water + pickling salt brine to a boil.
- Pour hot brine over beans, leave 1/2" headspace, adjust lids fingertip tight.
- Process jars in a boiling-water canner for 10 minutes (sea level), then cool and store.
Expect about 6–8 pints from 4 pounds of beans depending on how tightly you pack them. Allow at least two weeks for the beans to mellow and develop full flavor before opening a jar.
What you’ll need
- 4 pounds green or yellow beans (trimmed)
- 8–16 heads fresh dill (more for stronger flavor)
- 1/2 cup pickling salt (use canning/pickling or non-iodized fine salt)
- 4 cups 5% white vinegar
- 4 cups water
- 1 tsp red pepper flakes (optional, for heat)
- 8 cloves garlic (optional, peeled)
Notes and substitutions:
- Use 5% (standard) white vinegar—don’t swap in lower-strength vinegars without adjusting acidity.
- If you don’t have fresh dill, dill seed can be used but the flavor will differ; increase quantity for stronger dill flavor.
- Avoid iodized table salt; it can cloud the brine and affect flavor. Fine sea salt or pickling salt is best.
Step-by-step instructions
- Sterilize pint jars and lids. Keep them hot until ready to use.
- Wash beans. Trim the stem ends and cut into ~4-inch lengths.
- Into each hot pint jar place 1–2 dill heads and one peeled garlic clove, if using.
- Stand the beans upright in the jars and pack them tightly. Leave 1/2 inch headspace. Trim beans as needed to fit.
- In a medium saucepan combine the 4 cups vinegar, 4 cups water, 1/2 cup pickling salt, and red pepper flakes if using.
- Bring the brine to a rolling boil so the salt fully dissolves.
- Pour the hot brine over the packed beans. Keep 1/2 inch headspace. Tap jars to remove air bubbles.
- Wipe jar rims clean with a damp cloth. Place lids and screw on bands fingertip-tight.
- Place jars in a boiling-water canner. Ensure jars are covered by at least 1–2 inches of water. Add boiling water if needed.
- Process pint jars for 10 minutes at sea level. Adjust processing time for altitude (see storage/safety notes).
- When time is up, turn off heat. Remove jars with a lifter and let them cool undisturbed on the counter for 24 hours, or let them cool in the canner if preferred.
- After 24 hours, check seals. Remove bands, wipe jars, label with date, and store in a cool, dark place for up to one year.
01Ingredients
Main ingredients
02Method
- Preparation
- Canning
Tap a step when it's done. The next one lights up.
0 OF 12 DONE03Recipe notes
- 01For best flavor, allow at least two weeks for the beans to mellow before opening a jar. Avoid freezing pickled beans to maintain their crisp texture.
How did it turn out?
No ratings yet. Tap a star to be the first.
Snap a photo and tag @recipe_smoke1 so I can see how yours came out.
Best ways to enjoy it
- Serve whole as a crunchy snack with charcuterie, olives, and cheese.
- Chop and add to potato salad for a tangy crunch.
- Use a bean as a bold Bloody Mary garnish.
- Place on a sandwich or burger in place of pickles for texture contrast.
For a vegetable-forward dinner, these are lovely alongside sweet-glazed sides like honey-glazed carrots and green beans—the contrast of sweet and tart is a crowd-pleaser.
Storage and reheating tips
Unopened, properly processed jars are shelf-stable for up to one year in a cool, dark pantry.
After opening, refrigerate and use within 3–4 weeks for best texture and flavor.
Do not freeze pickled beans; freezing ruins the crisp texture.
If a jar fails to seal, refrigerate and consume within a week or reprocess with a fresh lid.
Always inspect jars before eating: discard jars with bulging lids, bad odor, or visible spoilage.
Altitude and safety note: Process pints for 10 minutes at sea level. If you live at higher elevations, increase processing time as follows (USDA-style guidelines): add 1 minute if 1,001–3,000 ft; add 2 minutes if 3,001–6,000 ft; add 3 minutes if 6,001–8,000 ft; add 4 minutes if 8,001–10,000 ft. When in doubt, check your local extension service or USDA canning resources for exact rules.
Flavor swaps
- Spicy: Add extra red pepper flakes, a sliced jalapeño, or a few crushed peppercorns.
- Garlicky: Increase garlic to 2 cloves per jar or use roasted garlic for mellow sweetness.
- Sweet-sour: For a bread-and-butter twist, add 1/2 cup sugar and 1 tsp mustard seed to the brine (this is a different style of pickle).
- Fermented version: Skip vinegar and ferment beans in a 2–3% salt brine for 5–10 days for tangy lacto-fermented beans—use a tested fermentation recipe for safety.
- Herb-forward: Swap some dill heads for fresh tarragon or add lemon zest for a brighter profile.
Your questions answered
How long before I can eat them?
A: Processed jars are safe to eat once cooled and sealed, but flavor improves after 1–2 weeks in the jar.
Can I use frozen beans?
A: No—frozen beans are softened and won’t retain the crisp texture pickling relies on. Use fresh, firm beans.
My lids didn’t seal—what now?
A: If a lid didn’t seal within 24 hours, refrigerate and use within a week, or reprocess with a new lid and the full processing time.
Can I use less vinegar or a milder vinegar?
A: Use 5% white vinegar as specified. Lower-acidity vinegars or altered ratios may make the product unsafe; follow tested recipes.
Is it necessary to boil jars first?
A: Yes—sterilizing jars and keeping them hot prevents contamination and helps ensure proper sealing.
Conclusion
If you want a spicier, well-tested riff on dilly beans, check out Spicy Dilly Beans Recipe – Serious Eats for inspiration. If you want something similar, my One-Pan Salmon with Green Beans is worth a try.
 Appetizer
 Appetizer
 Appetizer
