Japanese Katsu Bowls with Katsu Sauce
Crispy golden chicken cutlets served over fluffy rice, drizzled with tangy-sweet katsu sauce, creating a comforting and satisfying meal.

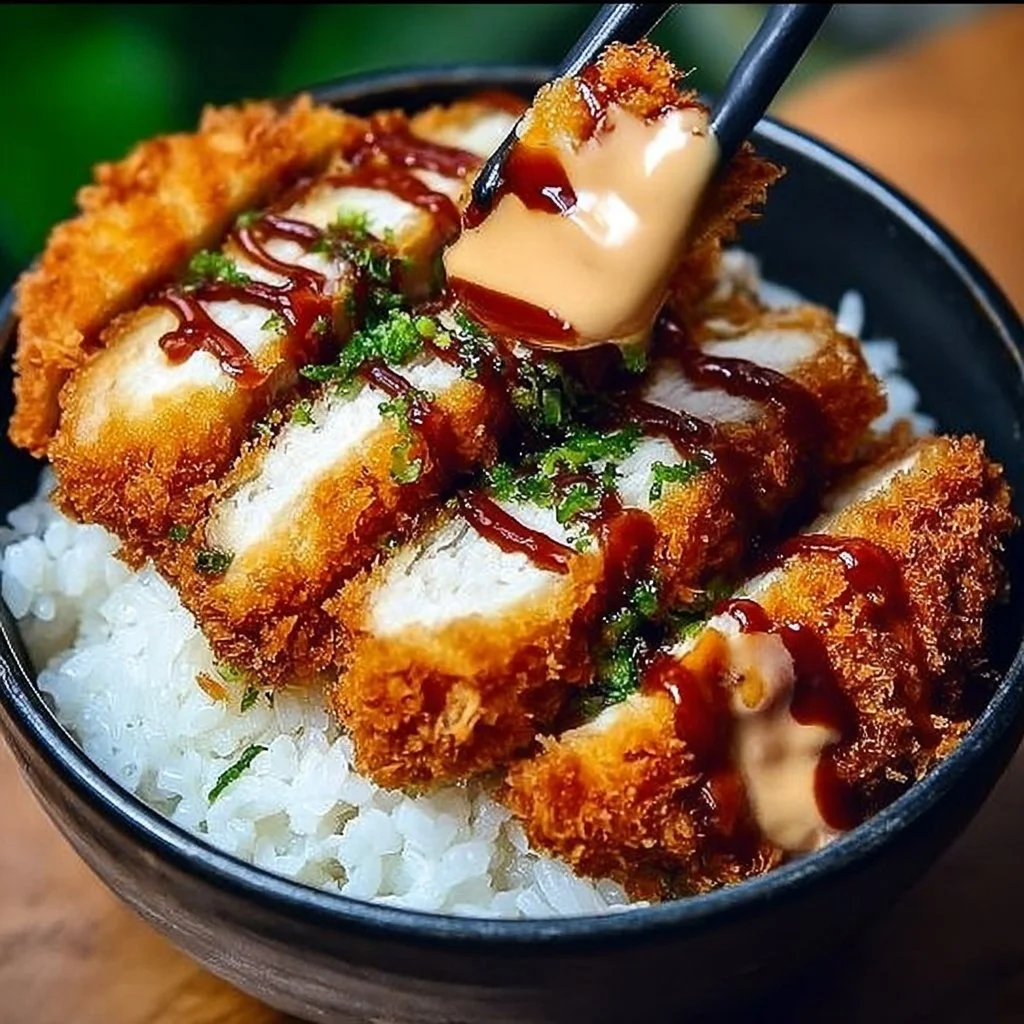
I first made these Japanese katsu bowls on a rainy weeknight when I wanted something comforting, easy, and a little crispy. The golden chicken cutlets, fluffy steamed rice, and tangy-sweet katsu sauce hit every craving—crispy texture, savory meat, and bright sauce all in one bowl. If you like quick rice bowls with big flavor, you might also enjoy my take on chicken broccoli bowls with creamy garlic sauce as another weeknight favorite.
Why you’ll love this dish
Katsu bowls feel indulgent but are surprisingly straightforward. They’re:
- Fast: the active cook time is mostly the breading and frying—about 20–30 minutes from start to finish.
- Family-friendly: kids and adults usually love the crispy texture and familiar flavors.
- Flexible: you can swap chicken, eggplant, or tofu without losing the soul of the dish.
- Comfort food that looks special: served over steamed rice with bright green onions, it’s weeknight-worthy yet restaurant-level.
The cooking process explained
Before you grab ingredients, here’s the quick flow so you know what to expect: season the chicken, pound or trim to an even thickness, dredge in flour, egg, and panko, then pan-fry until deep golden and cooked through. Rest briefly, slice, and build bowls on fresh steamed rice. Finish with katsu sauce and a scattering of green onions. The whole process focuses on two things: even thickness for fast, even cooking; and hot oil that crisps without burning.
What you’ll need
- Chicken cutlets (boneless, about ½-inch thick) — or thin chicken breast chops
- Salt and pepper
- All-purpose flour (for dredging; can use rice flour for a gluten-free option)
- Eggs, beaten
- Panko breadcrumbs (for the best crunch; gluten-free panko if needed)
- Vegetable oil (neutral oil with a high smoke point—canola, sunflower, or peanut)
- Steamed rice (short- or medium-grain for stickiness)
- Katsu sauce (store-bought or homemade; a tangy-sweet sauce similar to thick Worcestershire)
- Green onions, thinly sliced for garnish
Substitutions/notes: swap chicken for boneless chicken breasts or thighs (pounded thin), use eggplant or extra-firm tofu for vegetarian bowls, and consider adding a quick cabbage slaw for crunch.
Step-by-step instructions
- Pat chicken cutlets dry and season both sides with salt and pepper. If needed, pound to an even ½-inch thickness so they cook uniformly.
- Set up a dredging station: one plate of flour, a shallow bowl with beaten eggs, and a plate of panko breadcrumbs.
- Dredge a cutlet in flour, shake off excess. Dip it into the beaten eggs, then press into panko until evenly coated. Repeat with remaining cutlets.
- Heat a thin layer of vegetable oil in a large skillet over medium heat—about 1/8 to 1/4 inch deep. Test readiness by dropping a few panko crumbs; they should sizzle immediately.
- Fry cutlets without crowding the pan for 4–5 minutes per side, until the exterior is deep golden and an instant-read thermometer reads 145°F (63°C). Adjust heat to prevent burning.
- Transfer cooked cutlets to a wire rack to rest for 3 minutes (this keeps them crisp). Slice into strips.
- Spoon hot steamed rice into bowls. Arrange sliced cutlet on top. Drizzle katsu sauce generously over the meat and rice, then finish with chopped green onions.
01Ingredients
For the Katsu
For the Bowl
02Method
- Preparation
- Breading
- Cooking
- Assembly
Tap a step when it's done. The next one lights up.
0 OF 8 DONE03Recipe notes
- 01Serve with pickled cabbage or shredded cabbage salad. A soft-cooked egg on top makes it richer. For a full spread, add miso soup or cucumber sunomono.
How did it turn out?
No ratings yet. Tap a star to be the first.
Snap a photo and tag @recipe_smoke1 so I can see how yours came out.
Best ways to enjoy it
Serve the katsu bowl with pickled cabbage or a simple shredded cabbage salad dressed with rice vinegar and sesame oil for acidity. A soft-cooked egg on top makes it richer. For a full spread, add miso soup or a light cucumber sunomono. If you want another hearty rice-bowl option on a different night, try the protein-rich chicken enchiladas with dreamy white sauce as a complementary main.
Storage and reheating tips
Refrigerator: Store cooled cutlets and rice separately in airtight containers for up to 3–4 days. Keep sauce in a sealed container.
Freezing: Wrap individual cooked cutlets tightly in plastic wrap and foil, then freeze up to 2 months. Thaw overnight in the fridge before reheating. Do not freeze rice if you can avoid it; reheated rice can be dry or texturally off.
Reheating: To re-crisp, reheat cutlets in a 350°F (175°C) oven for 10–12 minutes, or use an air fryer at 350–375°F for 4–6 minutes. Microwave only if necessary—cover and heat briefly, then finish in the oven or skillet to regain crunch.
Food safety: Cook chicken to 145°F and allow a 3-minute rest. Refrigerate leftovers within 2 hours of cooking.
Creative twists
- Chicken katsu: use boneless chicken breasts or thighs instead of chicken for a lighter, classic variation.
- Katsu curry bowl: spoon Japanese curry over the sliced cutlet for a comforting one-bowl meal.
- Spicy katsu: mix Sriracha or gochujang into the katsu sauce for heat.
- Vegetarian katsu: slice and bread eggplant or press tofu and treat the same way for a satisfying meatless option.
- Gluten-free: use rice flour and certified gluten-free panko or crushed toasted rice crackers as a crunchy substitute.
- Toppings: add shredded cabbage, pickled ginger, sesame seeds, or a soft-runny egg.
Common questions
How long does this recipe take from start to finish?
A: Active time is about 20–30 minutes. If you include rice cooking time, add 15–20 minutes unless you’re using leftover or instant rice.
Can I use chicken instead of chicken?
A: Yes—thin-cut chicken breasts or thighs work well. Cook until the internal temperature reaches 165°F (74°C).
Is katsu sauce necessary?
What can I swap?
A: Katsu sauce is traditional, but you can use thick Worcestershire, okonomiyaki sauce, or make a quick mix of ketchup, Worcestershire, and a little soy sauce and sugar.
How do I keep the cutlet crispy after serving?
A: Serve immediately on a warm bowl of rice and keep the cutlet on a wire rack while prepping bowls. If you must hold them, keep at 200°F in the oven on a rack for up to 15 minutes.
Can I bread these ahead?
A: Yes—breaded cutlets can be refrigerated for a couple of hours before frying, which makes dinner prep much quicker.
Conclusion
These Japanese katsu bowls deliver crispy, comforting bowls with minimal fuss—perfect for busy nights or when you want a crowd-pleasing meal. For more ideas, check out Half Baked Harvest’s Crispy Chicken Katsu Bowls and my Chicken & Rice Bowls with Creamy Garlic Sauce.
 Dinner Bowls
 Dinner Bowls
 Dinner Bowls
