Valentine’s Day Cupcakes
Moist, evenly risen vanilla cupcakes with a tender crumb, topped with a classic buttercream frosting and heart-shaped decorations for a delightful treat.

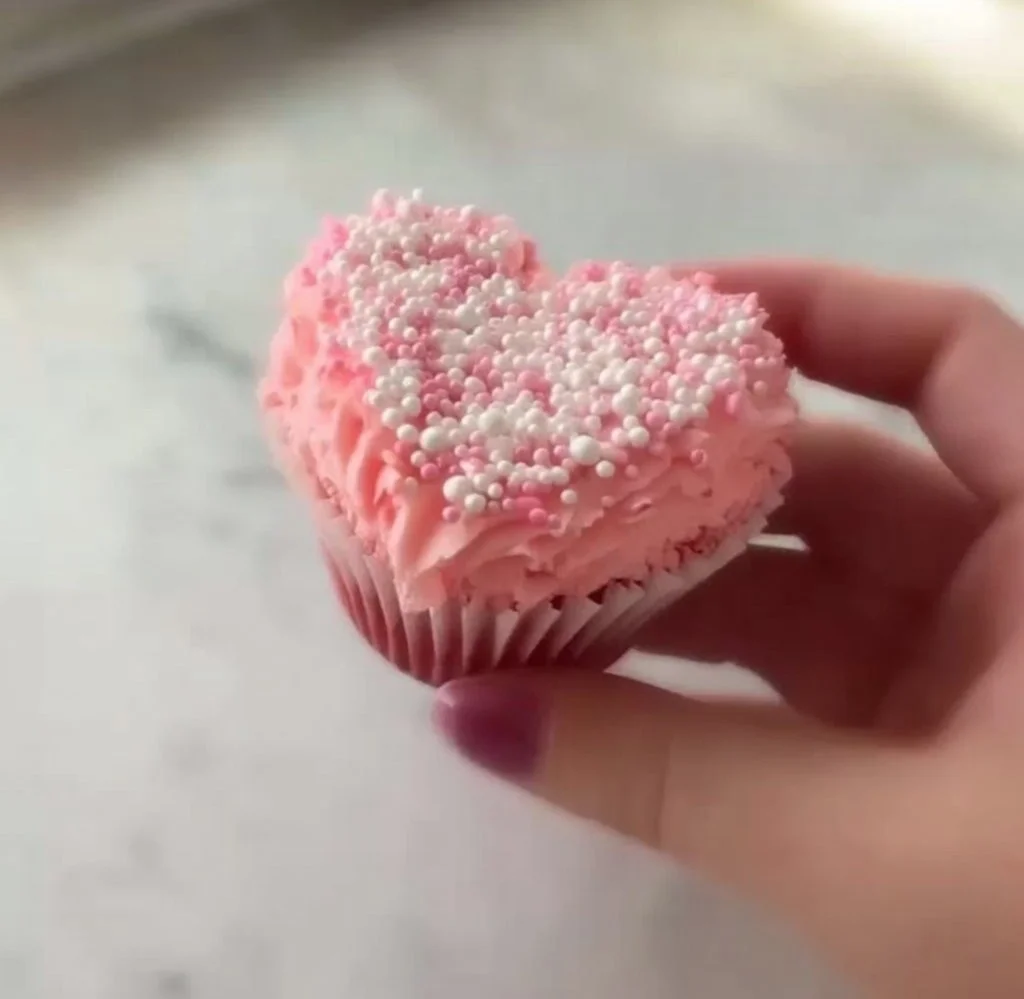
The warm, butter-and-vanilla smell that fills the kitchen as these cupcakes bake is the kind of detail that anchors a celebration — small, honest, and tactile. The crumb is fine but tender, the buttercream bright against a muted red crumb, and the finished cupcake reads like a well-told note: clear, confident flavor without unnecessary fuss. These cupcakes are built to be made ahead, decorated without stress, and enjoyed while still slightly warm or a day later with the buttercream settled into the crumb.
What gives this dish its depth
A few simple techniques deliver the most flavor here. Creaming butter and sugar traps air and creates a light internal structure; the eggs add richness and help emulsify the batter; the milk loosens the crumb so it stays tender without being wet. Vanilla pulls the profile together — don’t skimp — and a restrained amount of red food coloring gives the cupcakes a Valentine’s look without changing texture.
Why home-baked often wins: controlling ingredient quality (real butter, fresh eggs, good vanilla) yields a noticeably better mouthfeel and aroma than mass-produced counterparts. For a different spooky occasion, you can also see how playful decorating changes a simple cupcake in this blood-splattered Halloween cupcakes feature.
How the recipe develops step by step
Start by bringing your butter and eggs to near room temperature — they blend more readily and give a smoother batter. Creaming the butter and sugar until light and fluffy (about 3–5 minutes by hand, 2–3 minutes with a stand mixer) is the stage where texture is set: you’re incorporating air that helps the cupcakes rise evenly. Adding eggs one at a time preserves emulsion; alternating dry ingredients with milk prevents overworking the flour. Finally, color is purely visual — add a few drops of red coloring at the end and judge under natural light to avoid an overly artificial tone.
For visual inspiration on shaping and piping techniques, consider how different frosting styles change a cupcake’s presence; some decorated ideas are shown in this playful brain cupcake collection.
The flavor essentials
Ingredient lineup with notes:
- 1 1/2 cups all-purpose flour — provides structure; spoon and level for accuracy.
- 1 cup granulated sugar — sweetness and texture; creamed with butter for aeration.
- 1/2 cup unsalted butter, softened — use real butter for flavor; soften until pliable but not greasy.
- 2 large eggs — room temperature for best incorporation.
- 1/2 cup milk — whole milk preferred for mouthfeel; reduces dryness.
- 1 teaspoon vanilla extract — quality matters; this is the backbone flavor.
- 1 1/2 teaspoons baking powder — the lifting agent; check freshness.
- 1/2 teaspoon salt — balances sweetness and brightens flavors.
- Red food coloring — gel or paste gives color without thinning the batter.
- Buttercream frosting — classic pairing; see note below for a reliable formula.
- Heart-shaped sprinkles or decorations — for finishing texture and visual contrast.
Buttercream note: A reliable American buttercream starts with 1 cup (2 sticks) unsalted butter, 3 to 4 cups powdered sugar, 1–2 tablespoons milk or cream, and 1 teaspoon vanilla. Beat until smooth and pipeable; chill briefly if too soft.
How to cook it from start to finish
Step-by-step directions you can trust:
- Preheat the oven to 350°F (175°C). Line a 12-cup muffin tin with liners.
- In a mixing bowl, cream together the softened butter and sugar until light and fluffy — about 3–5 minutes by hand or 2–3 minutes with a mixer on medium speed. Scrape down the bowl once.
- Add the eggs one at a time, mixing well after each addition so the mixture remains emulsified.
- Stir in the milk and vanilla extract until combined.
- In a separate bowl, whisk together the flour, baking powder, and salt. Gradually add the dry ingredients to the wet, folding or mixing on low until just combined — stop as soon as you see no streaks of flour. Overmixing will tighten the crumb.
- Add red food coloring a drop or two at a time until the desired hue is reached; gel coloring is concentrated, so start small.
- Spoon the batter into the cupcake liners, filling each about 2/3 full to leave room for rise.
- Bake for 18–20 minutes, rotating the pan halfway if your oven has hot spots. A toothpick inserted into the center should come out clean or with a few moist crumbs.
- Transfer cupcakes to a wire rack to cool completely before frosting. Warm cupcakes will melt buttercream; fully cooled cupcakes keep piped shapes crisp. Finish with buttercream and heart-shaped decorations.
Practical timing: these steps (prep, mixing, baking) take roughly 45 minutes active, plus 30–60 minutes cooling and decorating.
01Ingredients
For the Cupcakes
For the Buttercream Frosting
For Decoration
02Method
- Preparation
- Baking
- Frosting
Tap a step when it's done. The next one lights up.
0 OF 13 DONE03Recipe notes
- 01Store leftovers in an airtight container at room temperature for 1–2 days or refrigerate for up to 5 days. Best served at room temperature.
How did it turn out?
No ratings yet. Tap a star to be the first.
Snap a photo and tag @recipe_smoke1 so I can see how yours came out.
Ways to enjoy it at its best
Serving ideas:
- Serve at room temperature so the buttercream softens slightly and the crumb is tender.
- Pair with a cup of medium-roast coffee or a bright sparkling white grape juice; acidity and bubbles cut the butteriness.
- For a more decadent option, split and spread with raspberry jam before piping frosting to add a bright fruit counterpoint.
- Present on a simple platter with mixed heights — piped cupcakes next to a few unfrosted examples reveal the texture and appeal.
Keep plating natural: a cloth napkin, a few fresh berries, and consistent piping make a small batch look intentional.
How to store without losing flavor
Keeping leftovers in good shape:
Short-term (1–2 days): store in an airtight container at room temperature. Cupcakes without perishable fillings hold well for a day or two.
Refrigeration (3–5 days): if your buttercream contains dairy (milk/cream), refrigerate. Bring to room temperature before serving for the best texture — about 30–60 minutes.
Freezing: freeze unfrosted cupcakes in a single layer, then transfer to a freezer bag for up to 3 months. Thaw at room temperature and frost after fully thawed. Frosted cupcakes can be frozen on a tray, then wrapped; thaw slowly in the refrigerator to avoid condensation.
Reheating: a brief 7–10 second zap in the microwave (on low) can revive a cupcake to warm, but avoid overheating, which dries the crumb.
Practical notes from experience
Ways to enhance the flavor:
- Use real vanilla extract, or for depth, 1/2 teaspoon vanilla and 1/4 teaspoon pure almond extract — almond amplifies the vanilla without tasting overtly nutty.
- If your butter is too soft, chill the batter briefly before baking to prevent excessive spread.
- For consistent results, weigh ingredients when possible (1 1/2 cups all-purpose flour ≈ 190 g).
- If you prefer denser cupcakes, reduce baking powder to 1 teaspoon; for a lighter cake, ensure the butter and sugar are thoroughly creamed.
- To avoid an overly red crumb, aim for a muted pink rather than fluorescent red; gel coloring achieves color with fewer drops.
For an example of how themed decorations change perception, see how visual design transforms cupcakes in this creative novelty cupcake collection.
Flavor paths you can explore
Ingredient swaps that still work:
- Strawberry: fold 1/4 cup puréed strawberries into the batter and reduce milk by 2 tablespoons; increase vanilla to 1 1/2 teaspoons. Top with strawberry buttercream.
- Chocolate: replace 1/4 cup of flour with 1/4 cup Dutch-process cocoa for a chocolate base — adjust sugar slightly if needed.
- Filled centers: hollow the cooled cupcake and add jam, chocolate ganache, or Nutella for a surprise bite.
- Egg-free: use a commercial egg replacer or 1/4 cup unsweetened applesauce plus an extra tablespoon of oil; expect a slightly denser crumb.
Small adjustments keep the method familiar while opening new flavor profiles.
What cooks usually ask
Practical answers to common concerns:
Can I use oil instead of butter?
Yes, oil will yield a moister crumb but less buttery flavor. If substituting, use neutral oil and expect a slightly denser cupcake.
How do I get even color throughout the batter?
Add gel food coloring late in mixing and fold gently until uniformly distributed. Avoid streaks by stirring just enough.
Why did my cupcakes dome or crack?
Oven too hot or overcreamed batter can cause rapid rise and doming. Check your oven temperature with a thermometer and reduce baking powder slightly if doming is persistent.
Can I make these ahead for Valentine’s Day?
Bake and freeze unfrosted cupcakes up to 3 months ahead; thaw and frost on the day for the freshest finish.
Conclusion
If you want a fruity twist on the same technique, this Valentine’s Day Cupid Cupcakes – Sally’s Baking recipe shows how folding real fruit into the batter changes texture and flavor. For a different spin, try my Valentine’s Day Chocolate Bark.
 Dessert
 Dessert
 Dessert
