Grilled Cheese Burrito
This grilled cheese burrito combines seasoned beef, gooey cheeses, and a crunchy cheese crust for a delicious comfort food twist that is perfect for weeknight dinners or potlucks.

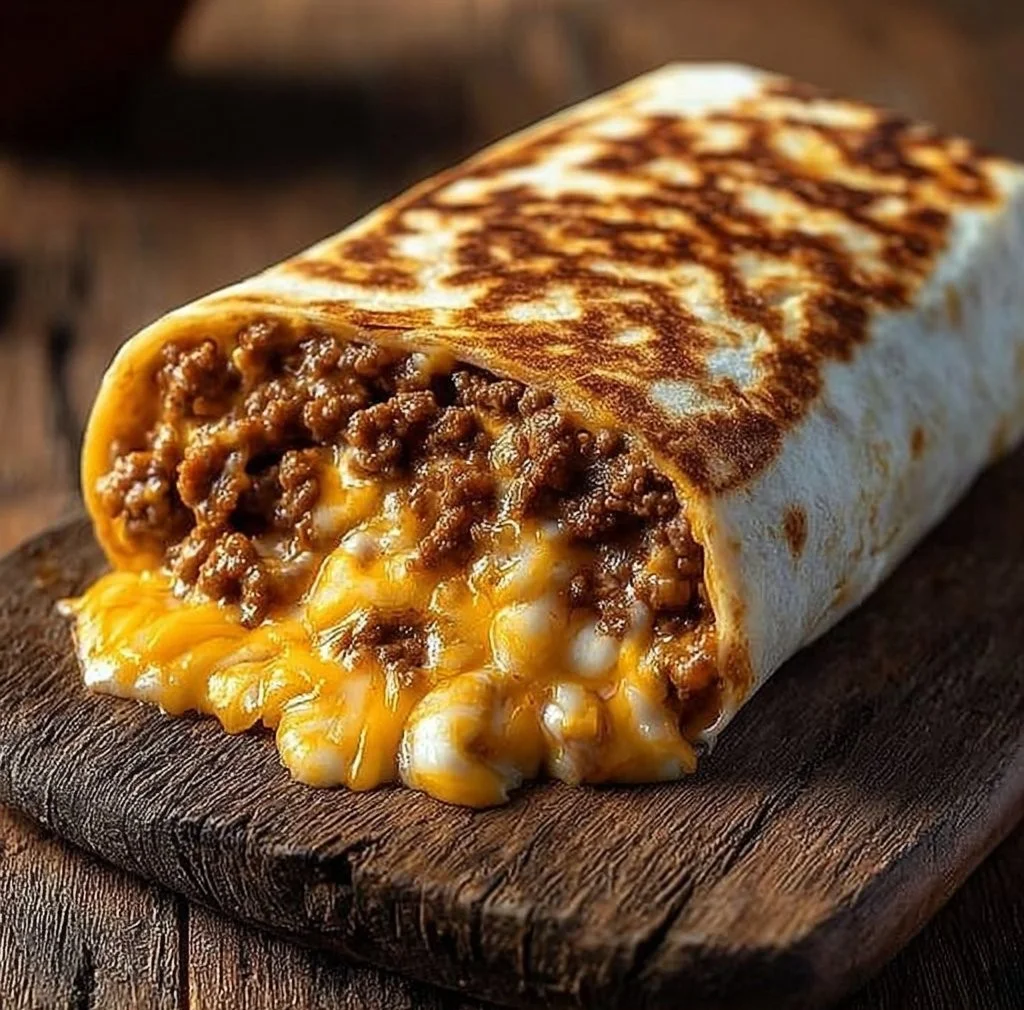
I still remember the first time I folded all the best parts of a burrito into a crispy, cheesy shell — it felt like comfort food on fast-forward. This grilled cheese burrito turns weeknight dinner into something exciting: seasoned beef, gooey cheeses, sneaky rice for heft, and a crunchy cheese crust that keeps every bite messy in the best way. If you want a fast, crowd-pleasing meal that travels well to the couch (or a potluck), this recipe nails it. For a sweet finish later, try something playful like Apple Cheesecake Tacos.
Why you’ll love this dish
This grilled cheese burrito is a love letter to comfort food and efficiency. It’s:
- Fast: Most of the work is browning beef; total hands-on time is about 25 minutes.
- Budget-friendly: Ground beef and rice stretch into four filling burritos.
- Kid-friendly yet bold: Mild cheesy notes with an optional chipotle kick for adults.
- Travel- and party-ready: Crispy exterior holds up well and reheats beautifully.
Beyond pickups and parties, this recipe is perfect for busy weeknights, late-night cravings, or when you want one-pan comfort without complicated prep.
Step-by-step overview
Before you dive into the ingredients, here’s how the recipe flows so you know what to expect:
- Brown and season the ground beef (8–10 minutes).
- Warm tortillas so they’re flexible.
- Layer rice, beef, sauces, and cheeses on a tortilla and roll.
- Grill the burrito seam-side down on a skillet with a sprinkle of cheese to create a crispy, cheesy crust (3–4 minutes per side).
- Slice and serve with your favorite sides.
If you like classic burrito builds, this is a crisp, cheesy spin on regular beef burritos that adds that addictive outer crunch.
What you’ll need
- 1 lb ground beef (80/20 for flavor; leaner if preferred)
- 1 packet taco seasoning (or homemade blend: chili powder, cumin, paprika, garlic powder, onion powder, salt)
- 1 cup cooked white rice (day-old rice works best to avoid sogginess)
- 1/2 cup sour cream
- 1/2 cup nacho cheese sauce (store-bought or warmed Velveeta-style sauce)
- 1/4 cup chipotle sauce (adjust for heat; sub with salsa for milder flavor)
- 1 cup shredded cheddar cheese
- 1 cup shredded mozzarella cheese
- 4 large flour tortillas (burrito-size)
- Butter or oil for grilling (1–2 tbsp)
Substitution notes: Use cooked brown rice or cauliflower rice for lower glycemic index. Swap ground turkey or plant-based crumbles for a lean or vegetarian option. Mix pepper jack with cheddar for more spice.
Step-by-step instructions
Brown the beef:
- Heat a large skillet over medium. Add the ground beef and break it up with a spatula.
- Cook 8–10 minutes until nicely browned and no pink remains.
- Drain excess grease into a heatproof container (avoid pouring down the sink).
- Return beef to skillet. Sprinkle in taco seasoning and add 1/4 cup water. Stir and simmer 4–5 minutes until the sauce clings to the meat. Remove from heat.
Warm the tortillas:
- Heat a dry skillet for 20–30 seconds per side or wrap tortillas in a damp paper towel and microwave 20–30 seconds. This prevents tearing during rolling.
Assemble the burritos (about 5 minutes each):
- Lay one tortilla flat. Spoon about 1/4 cup rice down the center.
- Add a generous portion of seasoned beef.
- Drizzle 2 tbsp nacho cheese and 1 tbsp chipotle sauce (or to taste).
- Add 2 tbsp sour cream.
- Sprinkle about 1/4 cup cheddar and 1/4 cup mozzarella over the top.
- Fold the sides in, then roll tightly from the bottom to form a snug burrito.
Grill to a crispy cheese crust (3–4 minutes per side):
- Wipe the skillet clean and heat over medium. Lightly butter or oil the pan.
- Sprinkle about 2 tbsp shredded cheese on the skillet (this will form the crust).
- Place the burrito seam-side down on top of the cheese. Press lightly with a spatula.
- Cook 3–4 minutes until the bottom is golden and the cheese beneath has melted into a crust.
- Flip and repeat on the other side, adding a bit more shredded cheese before flipping if you want an extra cheesy edge.
- Let rest 1 minute. Slice in half and serve hot.
01Ingredients
Main Ingredients
Substitution Notes
02Method
- Brown the Beef
- Warm the Tortillas
- Assemble the Burritos
- Grill to a Crispy Cheese Crust
Tap a step when it's done. The next one lights up.
0 OF 17 DONE03Recipe notes
- 01Best served with a crisp slaw or pico de gallo to cut richness, chips and salsa, guacamole, or a side salad. For brunch, top halves with a fried egg and hot sauce. Presentation tip: Slice on a diagonal and place on a warm plate. Drizzle a little extra chipotle sauce and sprinkle chopped cilantro for color. Storage: Refrigerate for 3–4 days or freeze for up to 2 months.
How did it turn out?
No ratings yet. Tap a star to be the first.
Snap a photo and tag @recipe_smoke1 so I can see how yours came out.
Best ways to enjoy it
Serve the grilled cheese burrito with:
- A crisp slaw or pico de gallo to cut richness.
- Chips and salsa, guacamole, or a side salad.
- Pickled jalapeños or a squeeze of lime for brightness.
- For brunch, top halves with a fried egg and hot sauce.
Presentation tip: Slice on a diagonal and place on a warm plate. Drizzle a little extra chipotle sauce and sprinkle chopped cilantro for color.
Storage and reheating tips
Refrigerator: Store cooled burritos in an airtight container for up to 3–4 days.
Freezer: Wrap tightly in parchment and foil or freezer paper. Freeze up to 2 months.
Reheat (from fridge): Reheat in a skillet over medium-low, covered, 4–6 minutes per side until heated through; the skillet preserves crispiness. Or reheat in a 350°F (175°C) oven for 12–15 minutes.
Reheat (from frozen): Bake at 375°F (190°C) for 25–30 minutes, wrapped in foil for the first 15 minutes to avoid over-browning. Finish unwrapped for 5 minutes to re-crisp.
Food safety: Reheat leftovers to 165°F (74°C) internal temperature. Discard any perishable fillings left out more than 2 hours.
Creative twists
- Vegetarian: Replace beef with seasoned black beans or spiced crumbled tofu. Add roasted peppers and onions.
- Breakfast version: Swap beef for breakfast sausage, add scrambled eggs, and use pepper jack.
- Smoky BBQ: Replace chipotle sauce with a smoky BBQ sauce and add caramelized onions.
- Healthier swap: Use whole wheat tortillas and reduced-fat cheeses; add avocado slices for creaminess.
- Regional spin: Add green chiles and swap nacho sauce for queso verde for a Southwestern vibe.
- Fusion idea: Stuff with crispy turkey bacon and pickled onions for a burger-inspired twist (think Turkey bacon Cheeseburger Pasta energy in a burrito).
Your questions answered
How long does this take from start to finish?
A: Plan 25–30 minutes total: 8–10 minutes to brown beef, 5 minutes to simmer with seasoning, 5 minutes to assemble, and ~8 minutes to grill both sides.
Can I prep components ahead of time?
A: Yes — cook the beef and rice up to 3 days ahead. Assemble and refrigerate, then grill when ready. For longer storage, assemble and freeze.
Can I make these gluten-free?
A: Yes — use gluten-free tortillas (corn or packaged gluten-free flour) and check that your taco seasoning and sauces are gluten-free.
How do I prevent a soggy burrito?
A: Use well-drained fillings, room-temperature rice, and warm tortillas. Avoid excess wet sauces; a little goes a long way.
Can I make this in an air fryer?
A: Absolutely. Brush the burrito with a little oil and air-fry at 375°F (190°C) for 6–8 minutes per side until golden and heated through. Add a sprinkle of cheese on top during the last 2 minutes to crisp.
Conclusion
For more ideas, check out Grilled Cheese Burrito | Taco Bell® and my Grilled Cheese Burrito.
Enjoy the crunch, the cheese pull, and the comfort — this grilled cheese burrito is simple to make and hard to resist.
 Crockpot & Slow Cooker
 Dinner Bowls
 Casseroles
