Beef and Cheese Chimichangas
Crispy, cheesy chimichangas filled with seasoned ground beef and melty cheese, perfect for a quick weeknight dinner or a fun family meal.

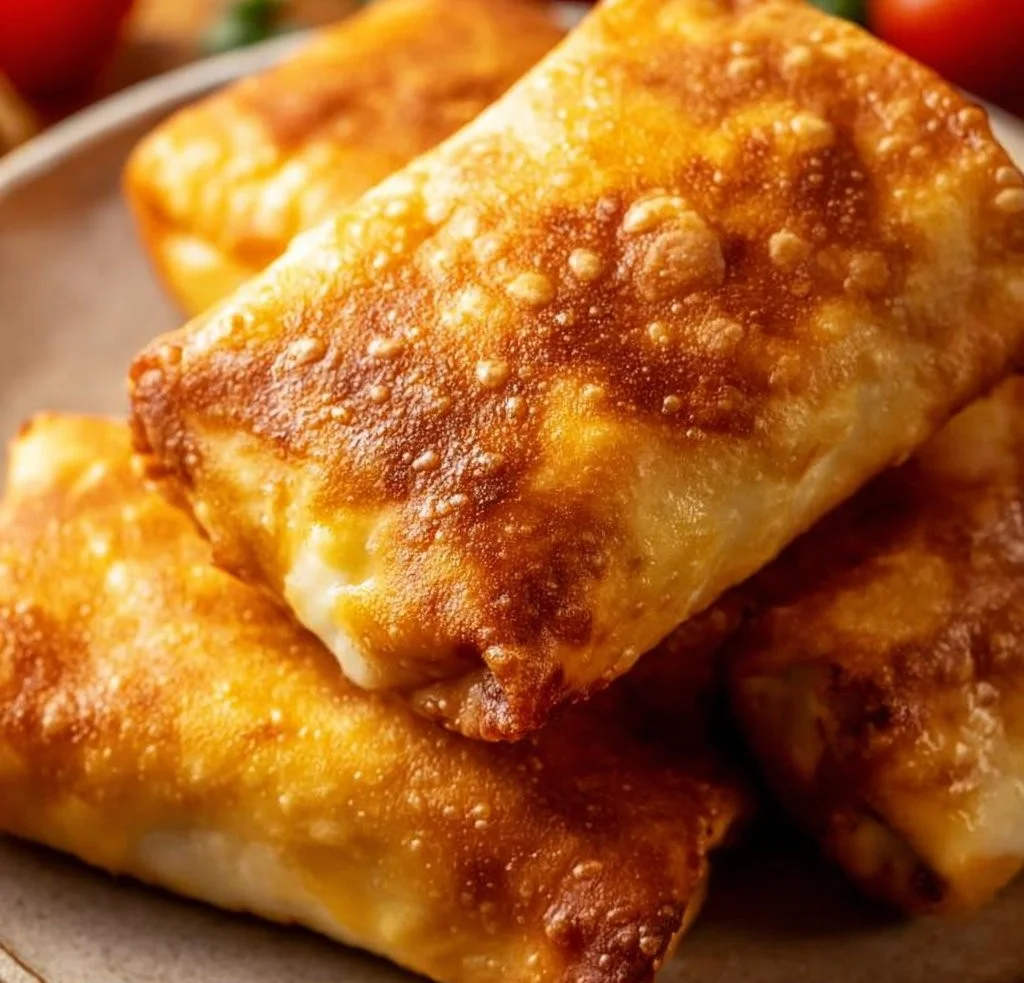
I have a soft spot for chimichangas. The first time I made these beef and cheese chimichangas, a busy weeknight turned into an unexpectedly celebratory dinner—crispy, cheesy, and forgiving if you’re short on time. They’re great when you want something comforting and handheld, and they scale easily for family meals or game-day snacks. If you like make-ahead dinners that still crisp up like they were just fried, this is your recipe—and it pairs nicely with other weeknight winners like baked spinach and cheese egg cups for a brunch-style twist.
Why you’ll love this dish
Beef and cheese chimichangas deliver big flavor with minimal fuss. Ground beef cooks fast, the filling is adaptable, and you can choose oven-baked or pan-fried textures. They’re budget-friendly, kid-approved, and easy to feed a crowd. Make them for a quick weeknight, a casual party, or a weekend cookout where everyone assembles their own toppings.
Beyond comfort, they’re useful: prepare the filling ahead, roll the chimis the day before, then crisp them up just before serving.
Step-by-step overview
- Brown seasoned ground beef with onions and garlic.
- Stir in salsa and simmer briefly.
- Spread refried beans and add the beef + cheese on tortillas.
- Roll tightly and seal.
- Bake for a healthier crisp or pan-fry for extra crunch.
- Rest briefly, then top and serve.
This quick overview helps you visualize the whole process before you start.
What you’ll need
- 1 lb ground beef (80/20 for flavor; leaner if you prefer)
- 1 small onion, finely diced
- 2 cloves garlic, minced
- 1 packet (1 oz) taco seasoning, or use 2 tbsp homemade mix (chili, cumin, garlic, onion powder, salt)
- 1/2 cup salsa (mild, medium, or spicy)
- 1 cup refried beans (canned or homemade)
- 1 1/2 cups shredded cheddar or Mexican blend cheese
- 6 large flour tortillas (burrito-size)
- 2 tbsp vegetable oil (for brushing or shallow frying)
Substitutions/notes: Swap ground turkey or shredded chicken for beef. Use black beans mashed with a splash of lime for a heartier vegetarian swap. Corn or whole-wheat tortillas work, but warm them first so they fold without cracking.
Step-by-step instructions
- Prep: Finely dice the onion and mince the garlic. Preheat the oven to 400°F (200°C) if baking.
- Cook the beef filling: Heat a large skillet over medium. Add the ground beef and diced onion. Cook, stirring and breaking up meat, until browned and the onion is softened (about 6–8 minutes).
- Drain: Carefully drain excess grease from the pan. Return the meat to the skillet.
- Flavor: Stir in the minced garlic, taco seasoning, and salsa. Reduce heat and simmer 3–4 minutes until everything is well combined and slightly saucy. Remove from heat.
- Assemble: Lay a tortilla flat. Spread about 2 tbsp refried beans down the center. Top with a generous scoop of the beef mixture (about 1/3 cup) and a handful of shredded cheese. Fold in the sides, then roll tightly to seal like a burrito. Repeat with remaining tortillas.
- Cook — Oven method (healthier): Place chimichangas seam-side down on a baking sheet. Lightly brush each with vegetable oil. Bake at 400°F (200°C) for 18–20 minutes, flipping once, until golden and crisp.
- Cook — Skillet method (crispier): Heat 2–3 tbsp oil in a skillet over medium. Add chimichangas seam-side down. Cook 2–3 minutes per side until deep golden and crisp, turning carefully so they don’t tear. Transfer to a paper-towel-lined plate to drain briefly.
- Rest and serve: Let rest 1–2 minutes. Add toppings like sour cream, guacamole, shredded lettuce, salsa, or hot sauce, and serve warm.
Keep instructions short and decisive for a smooth cook-through.
Beef and Cheese Chimichangas
- Prep
- 15 MIN
- Cook
- 30 MIN
- Total
- 45 MIN
- Serves
- 6
01Ingredients
For the filling
For assembling
02Method
- Preparation
- Cooking the filling
- Assembling the chimichangas
- Cooking
- Serving
Tap a step when it's done. The next one lights up.
0 OF 8 DONE03Recipe notes
- 01Make-ahead and freeze for later. Serve with sides like cabbage slaw or cilantro-lime rice.
How did it turn out?
No ratings yet. Tap a star to be the first.
Snap a photo and tag @recipe_smoke1 so I can see how yours came out.
Best ways to enjoy it
These chimichangas are delicious on their own, but a few thoughtful sides turn them into a meal: a bright cabbage slaw, cilantro-lime rice, or a simple salad with avocado and lime. For a contrast in texture, serve with pico de gallo and a scoop of sour cream. If you’re building a party spread, think nacho-style toppings—olives, jalapeños, and pickled onions.
For a cozy duo, pair the chimichangas with roasted vegetables or a melty sandwich—here’s a simple roasted broccoli and grilled cheese idea that complements their richness: balsamic roasted broccoli and red pepper grilled cheese.
Storage and reheating tips
Refrigerate: Store cooled chimichangas in an airtight container for up to 3–4 days.
Freeze: Wrap individually in foil and place in a freezer bag. Freeze up to 2 months. Thaw overnight in the fridge before reheating.
Reheat from fridge: Oven or toaster oven at 350°F (175°C) for 10–12 minutes until warmed and crisp. An air fryer at 350°F for 6–8 minutes works well.
Reheat from frozen: Bake at 375°F (190°C) for 18–22 minutes, turning once, until heated through.
Food safety: Reheat leftovers to an internal temperature of 165°F (74°C) to ensure safety.
Creative twists
- Chicken & green chile: Swap beef for shredded rotisserie chicken and fold in canned green chiles.
- Breakfast chimichangas: Fill with scrambled eggs, breakfast sausage, and cheddar; serve with salsa and hash browns.
- Vegetarian: Use seasoned lentils or a sauté of mushrooms, peppers, and black beans with plenty of spices.
- Spicy: Add chipotle in adobo to the filling or use pepper jack cheese.
- Air-fryer version: Spray chimichangas lightly with oil and air-fry at 375°F for 6–8 minutes until crisp.
Helpful answers
Can I make the filling ahead?
A: Yes—make the beef filling up to 3 days ahead and store in the fridge. Assemble and bake or pan-fry when ready for the best texture.
How can I keep chimichangas from falling apart while frying?
A: Roll them tightly and place seam-side down in the pan first. Don’t move them until the bottom is golden and sealed. A light brush of oil over the seam can help it stick.
Are chimichangas the same as burritos?
A: They start like burritos, but chimichangas are typically fried or baked until crisp, which sets them apart from the soft, steamed or wrapped burrito.
Can I make these vegetarian or gluten-free?
A: Yes—use refried beans and a seasoned veggie filling for vegetarian. For gluten-free, choose corn or certified gluten-free flour tortillas (note: corn tortillas are less flexible and may crack).
Conclusion
If you want another take to compare techniques or flavor profiles, this Beef Chimichangas Recipe – Allrecipes is a helpful reference for traditional approaches. You might also like my Easy Beef Chimichangas Recipe.
 Crockpot & Slow Cooker
 Dinner Bowls
 Casseroles
