Pink Velvet Celebration Cake
A show-stopping cake with soft, tender layers stained a gentle rose and stacked with tangy cream cheese frosting, perfect for birthdays and celebrations.

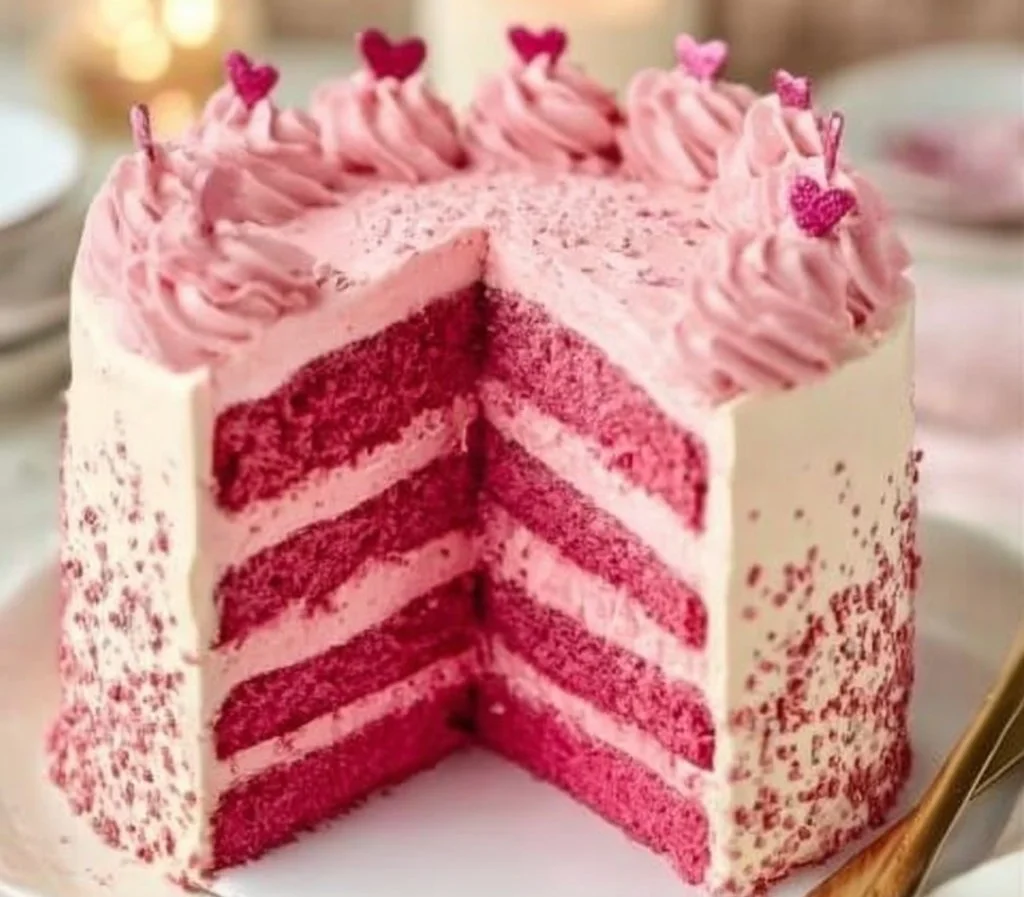
I made this Pink Velvet Celebration Cake for a small birthday last month, and it was exactly the kind of show-stopper that tastes familiar but looks festive. Soft, tender layers stained a gentle rose and stacked with tangy cream cheese frosting, it’s great for birthdays, baby showers, or any time you want a cake that feels celebratory without being fussy. If you like cupcake-sized treats, try this version alongside your cake — I usually keep a tray of pink velvet cupcakes for guests who prefer single servings.
Why you’ll love this dish
This cake hits a sweet spot: it looks special but uses pantry-friendly ingredients and a straightforward method. The small amount of cocoa adds depth without making it chocolate-y, and the vinegar+baking soda reaction helps the crumb stay light. It’s great when you want something different from classic vanilla or red velvet but still crowd-pleasing.
Reasons to try it:
- Easy to scale up or down for parties.
- Kid-approved color and mild flavor.
- Uses simple mixing techniques — no complicated folding or tempering.
- Works well with easy cream cheese frosting for reliable results.
How this recipe comes together
Quick process overview so you know what to expect:
- Cream butter and sugar until fluffy to create structure.
- Add eggs for richness and lift.
- Alternate dry ingredients with buttermilk to keep the batter moist.
- Stir in pink food coloring and a splash of vinegar for lift and subtle tang.
- Bake in three 9-inch pans, cool, then stack with cream cheese frosting.
This short roadmap helps you time pans, cooling, and frosting so the party timeline stays relaxed.
What you’ll need
- 2 1/2 cups all-purpose flour (for a lighter crumb, substitute 1/4 cup with cake flour)
- 1 1/2 cups granulated sugar
- 1 cup unsalted butter, softened
- 1 cup buttermilk, room temperature (sub: plain yogurt thinned with a little milk)
- 3 large eggs
- 2 tablespoons cocoa powder (unsweetened)
- 1 tablespoon pink food coloring (gel gives stronger color with less liquid)
- 1 teaspoon vanilla extract
- 1 teaspoon baking soda
- 1 teaspoon salt
- 1 tablespoon white vinegar
Frosting:
- 8 oz cream cheese, softened
- 1/2 cup unsalted butter, softened
- 3–4 cups powdered sugar (adjust for sweetness/consistency)
- 1 teaspoon vanilla extract
- Pinch of salt
Notes: Use room-temperature eggs and buttermilk for best emulsification. If you want a vegan version, see the Variations section below.
Step-by-step instructions
- Preheat the oven to 350°F (175°C). Grease and flour three 9-inch round cake pans, or line the bottoms with parchment.
- In a large bowl, cream the softened butter and granulated sugar until light and fluffy (about 3–4 minutes with a stand mixer or 5–6 by hand).
- Add the eggs one at a time, beating well after each addition so the batter stays smooth.
- In a separate bowl, whisk together the flour, cocoa powder, baking soda, and salt.
- Add the dry ingredients to the butter mixture in three parts, alternating with the buttermilk (dry, wet, dry, wet, dry). Mix just until combined — don’t overmix.
- Stir in the pink food coloring and vanilla extract until the color is even.
- Gently fold in the white vinegar with a spatula. The batter may bubble slightly — that’s normal.
- Divide the batter evenly among the three prepared pans and smooth the tops.
- Bake for 25–30 minutes, or until a toothpick inserted into the center comes out clean or with a few moist crumbs.
- Let the cakes rest in their pans for 10 minutes, then invert onto a wire rack to cool completely.
- For the frosting: beat the cream cheese and butter together until creamy. Gradually add powdered sugar until you reach a fluffy, spreadable consistency; add vanilla and a pinch of salt to balance the sweetness.
- Level the cakes if needed, then layer with cream cheese frosting. Finish by frosting the sides and top and add sprinkles, fresh berries, or piped swirls as desired.
Pink Velvet Celebration Cake
- Prep
- 40 MIN
- Cook
- 30 MIN
- Total
- 2 HRS
- Serves
- 12
01Ingredients
Cake Ingredients
Frosting Ingredients
02Method
- Preparation
- Baking
- Frosting
Tap a step when it's done. The next one lights up.
0 OF 12 DONE03Recipe notes
- 01Store covered for up to 24 hours at room temperature. In the refrigerator, keep in an airtight container for 3–4 days. Wrap individual cooled layers tightly in plastic wrap and foil for freezing up to 2 months. Don’t leave slices out for more than two hours due to cream cheese frosting.
How did it turn out?
No ratings yet. Tap a star to be the first.
Snap a photo and tag @recipe_smoke1 so I can see how yours came out.
Best ways to enjoy it
- Slice thinly for a dessert buffet alongside fresh berries and tea.
- Serve with a dollop of whipped cream and a few raspberries for contrast.
- Pair a slice with a cup of medium-roast coffee or a fragrant Earl Grey — the slight citrus notes in the tea contrast the cake’s tangy frosting.
- For an afternoon treat, plate a modest slice with homemade vanilla bean ice cream.
If you want bite-sized fun at your next party, turn leftovers into truffles or cake balls similar to the rich texture of red velvet cake balls.
Storage and reheating tips
Room temperature: Store covered for up to 24 hours (cream cheese frosting is perishable).
Refrigerator: Keep in an airtight container or cake box for 3–4 days. Let slices come to room temperature before serving to revive texture and flavor.
Freezing: Wrap individual cooled layers tightly in plastic wrap and then foil; freeze up to 2 months. Thaw in the fridge overnight, then bring to room temperature before frosting.
Reheating: For chilled slices, let sit at room temperature for 30–60 minutes. Warm briefly (8–12 seconds) in a microwave on low power if you prefer warm cake — but watch the frosting.
Food safety note: Because the frosting contains cream cheese, don’t leave slices out more than two hours at room temperature.
Creative twists
- Berry swirl: Fold in 1/2 cup of mashed raspberries into your frosting for a pink ripple and bright flavor.
- Chocolate-hazelnut: Add 1/4 cup melted and cooled Nutella into the frosting for a richer profile.
- Vegan version: Use plant-based butter, vegan cream cheese, and a buttermilk substitute (1 cup almond milk + 1 tbsp vinegar). Replace eggs with flax eggs (3 tbsp flax + 9 tbsp water), but expect a slightly different crumb.
- Floral finish: Brush the layers with a light syrup (2 tbsp sugar + 2 tbsp water + 1 tsp rosewater) before frosting for extra moisture and aroma.
Common questions
How long does this cake take from start to finish?
A: Active prep is about 30–40 minutes (mixing, dividing pans). Baking and cooling add 2–3 hours total if you let layers cool completely before frosting. Plan ahead for best results.
Why is there vinegar in the batter?
A: The vinegar reacts with baking soda to create extra lift and a tender crumb. It doesn’t leave a vinegar taste once baked.
Can I make this into two 9-inch layers instead of three?
A: Yes—bake in two pans, but the layers will be thicker and may need a few extra minutes in the oven. Watch for doneness with a toothpick.
Can I use natural food dye instead of artificial coloring?
A: Natural beet powder gives pink color but may shift flavor slightly. Use concentrated natural gels specifically made for baking to avoid changing batter consistency.
How do I avoid a sunken cake?
A: Ensure accurate oven temperature, don’t open the oven door during the first 20 minutes, and measure leavening correctly. Overbeating eggs or underbaking can also cause collapse.
Conclusion
This Pink Velvet Celebration Cake is an accessible yet festive option when you want a cake that looks special without complicated techniques. For a glossy tutorial and inspiration for marbled or decorated versions, see Pink Velvet Cake recipe from Chelsweets. For a different spin, try my Pink Velvet Cake.
 Cakes
Cakes Cakes
Cakes Cakes
Cakes
