Valentine’s Day Cake
A moist and tender chocolate cake that is easy to make and perfect for Valentine's Day celebrations.

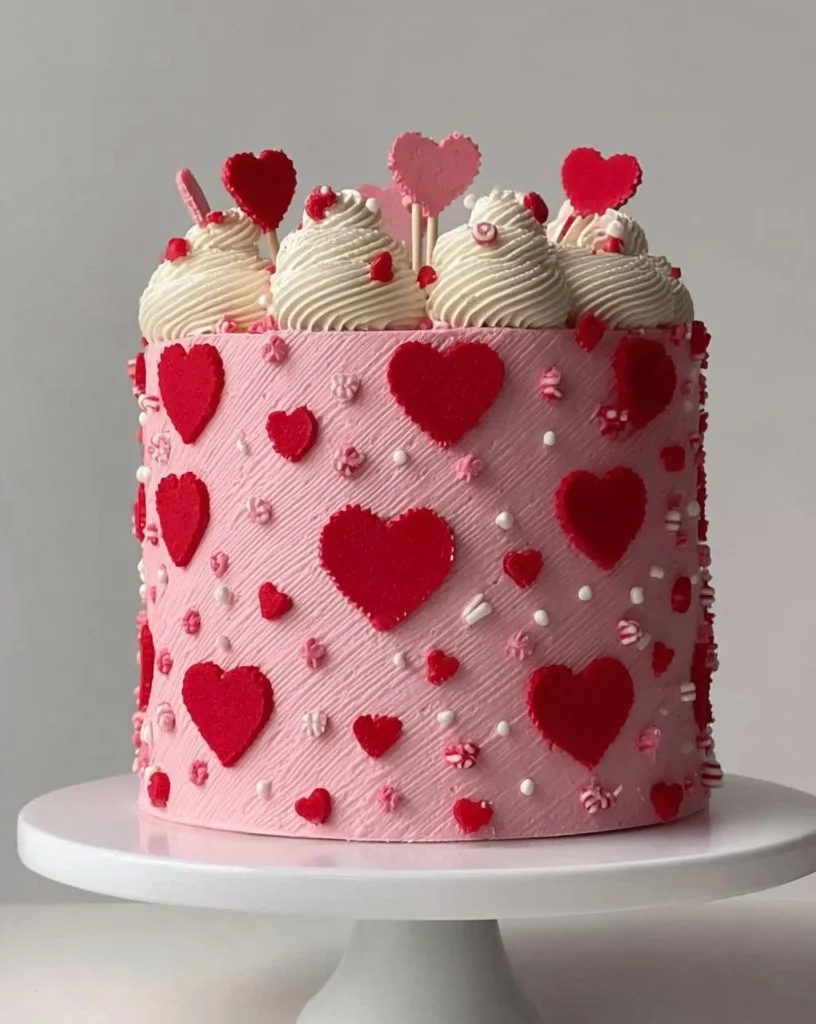
I have a soft spot for this simple, chocolatey Valentine’s Day cake — it’s the one I turn to when I want something that looks special without spending all day decorating. Moist, tender layers, a silky buttercream, and a scattering of sprinkles or edible flowers make it perfect for a cozy celebration, school parties, or a last-minute romantic dessert.
I also like to pair small slices with lighter treats like heart-shaped cupcakes; if you’re planning a dessert spread, check out my favorite Valentine’s Day cupcakes for coordinating flavors and décor.
Why you’ll love this dish
This cake hits all the sweet spots: quick to throw together, forgiving in the oven, and pleasantly rich without being heavy. It’s an approachable chocolate layer cake that doesn’t require special equipment or advanced piping skills, which makes it perfect for home bakers who want something festive but practical.
Reasons to make it now:
- Fast: Batter comes together in one bowl and gets a boost of boiling water for extra moistness.
- Budget-friendly: Pantry staples—no fancy extracts, unusual flours, or specialty chocolate needed.
- Kid-friendly: Little helpers can mix and decorate with sprinkles or flowers.
- Versatile: Use the same batter for cupcakes, sheet cake, or stacked tiers.
How this recipe comes together
Overview — quick steps so you know what to expect:
- Combine dry ingredients. 2) Whisk in eggs, milk, oil, and vanilla. 3) Stir in boiling water to loosen the batter (this makes it very moist). 4) Bake in two 9-inch pans, cool, then frost with a simple buttercream. The batter is thin — that’s normal — and the boiling water blooms the cocoa for a deep chocolate flavor.
What you’ll need
- 2 cups all-purpose flour (sub: 1:1 gluten-free flour blend for GF, though texture will vary)
- 1 1/2 cups granulated sugar
- 1/2 cup unsweetened cocoa powder (prefer Dutch-processed for deeper flavor or natural for a brighter cocoa note)
- 1 1/2 teaspoons baking powder
- 1 1/2 teaspoons baking soda
- 1 teaspoon salt
- 2 large eggs (room temperature)
- 1 cup milk (whole milk is best; use a non-dairy milk + 1 tablespoon vinegar for a buttermilk substitute)
- 1/2 cup vegetable oil (neutral oil keeps crumb tender; melted butter can be used for more flavor)
- 2 teaspoons vanilla extract
- 1 cup boiling water (careful when adding)
Frosting:
- 1 cup (2 sticks) unsalted butter, softened to room temperature
- 4 cups powdered (confectioners’) sugar, sifted if lumpy
- 1/2 cup milk, plus more to adjust consistency
- 1 teaspoon vanilla extract
- Decorative sprinkles or edible flowers (optional)
Note: For a lighter frosting, reduce butter by 2 tablespoons and replace with 1/2 cup cream cheese.
Directions to follow
- Preheat and prepare pans: Heat oven to 350°F (175°C). Grease and lightly flour two 9-inch round cake pans, or line bottoms with parchment.
- Mix dry ingredients: In a large bowl, whisk together flour, sugar, cocoa powder, baking powder, baking soda, and salt until uniform.
- Add wet ingredients: Add eggs, milk, vegetable oil, and vanilla extract. Beat or whisk until smooth and homogenous.
- Add boiling water: Carefully pour in the cup of boiling water and stir until the batter is smooth. The batter will be thin — that’s expected and helps create a moist crumb.
- Bake: Divide batter evenly between the prepared pans. Bake 30–35 minutes, or until a toothpick inserted in the center comes out with a few moist crumbs (not wet batter). Rotate pans halfway if your oven has hot spots.
- Cool: Let cakes cool in the pans for about 10 minutes, then turn them out onto wire racks to cool completely before frosting. Cooling prevents the frosting from melting.
- Make the frosting: Beat the softened butter on medium speed until creamy, about 2 minutes. Gradually add powdered sugar, alternating with the 1/2 cup milk, until you reach a spreadable consistency. Mix in the vanilla. If too thick, add milk 1 teaspoon at a time; if too thin, add more powdered sugar.
- Assemble and decorate: Level cakes if needed. Place the first layer on a serving plate, spread a generous layer of frosting, set the second layer on top, and crumb-coat if you like. Finish with a smooth top coat of buttercream and garnish with sprinkles or edible flowers.
01Ingredients
Cake Ingredients
Frosting Ingredients
02Method
- Preparation
- Baking
- Frosting
- Assembly
Tap a step when it's done. The next one lights up.
0 OF 11 DONE03Recipe notes
- 01Store frosted cake at room temperature for up to 2 days. Refrigerate if warm. Freeze unfrosted layers for up to 3 months.
How did it turn out?
No ratings yet. Tap a star to be the first.
Snap a photo and tag @recipe_smoke1 so I can see how yours came out.
Best ways to enjoy it
Serve this cake at room temperature for the best texture. Slice modest pieces (chocolate is rich) and consider pairing with:
- Fresh berries or raspberry coulis to cut the sweetness.
- A scoop of vanilla or salted caramel ice cream for contrast.
- Espresso or a light fruity grape juice for adults.
For a party, create a dessert platter with this cake, heart-shaped cookies, and the coordinating cupcakes mentioned earlier.
How to store & freeze
Short-term: Store frosted cake at room temperature, loosely covered, for up to 2 days. Keep away from direct heat or sunlight.
Refrigeration: If your kitchen is warm or the cake has perishable fillings, cover and refrigerate for up to 5 days. Bring to room temperature before serving for best flavor.
Freezing: Freeze unfrosted layers wrapped tightly in plastic and foil for up to 3 months. Thaw in the refrigerator overnight, then come to room temp before frosting. You can also freeze a fully frosted cake (flash-freeze until solid, then wrap) but note the frosting texture may change slightly. Follow safe food handling: discard if you see signs of spoilage or if left at room temperature over 2 hours in hot conditions.
Creative twists
- Flavor swaps: Add 1–2 tablespoons instant espresso powder to the boiling water for mocha notes. Replace 1/4 cup of oil with melted dark chocolate for a richer cake.
- Fillings: Spread raspberry jam, chocolate ganache, or whipped cream between layers.
- Dietary swaps: Use a 1:1 gluten-free flour blend and a plant-based milk for a gluten-free/dairy-free version (results may vary). Use coconut oil or neutral vegetable oil to keep it vegan-friendly when combined with egg replacers.
- Mini cakes: Bake in 6-inch pans for a petite centerpiece; reduce bake time by ~10 minutes.
Helpful answers
How long does this take from start to finish?
A: Active prep is about 20–25 minutes. Baking and cooling add roughly 1.5–2 hours total depending on cooling time.
Can I use this as cupcakes?
A: Yes — fill cupcake liners 2/3 full and bake 18–22 minutes. Watch closely after 15 minutes since oven temps vary.
My frosting is too sweet — what can I do?
A: Add a pinch of salt or 1–2 teaspoons of lemon juice to the frosting to balance sweetness. Reducing powdered sugar slightly and using a touch more butter or cream cheese also helps.
Is the boiling water really necessary?
A: It’s optional but recommended. The hot water intensifies cocoa flavor and keeps the cake moist; the thin batter is intentional.
Can I make this ahead?
A: Yes. Bake layers a day ahead, wrap them tightly, and assemble the next day. Alternatively, assemble and refrigerate; bring to room temperature before serving.
Conclusion
For more ideas, check out Valentine’s Day Cake — Handle the Heat and my Valentine’s Day Cake. Happy baking — and may your cake bring smiles.
 Cakes
Cakes Cakes
Cakes Cakes
Cakes
