Cheesy Garlic Chicken Wraps
These cheesy garlic chicken wraps are quick, budget-friendly, and endlessly adaptable, perfect for weeknight dinners and lunch leftovers.

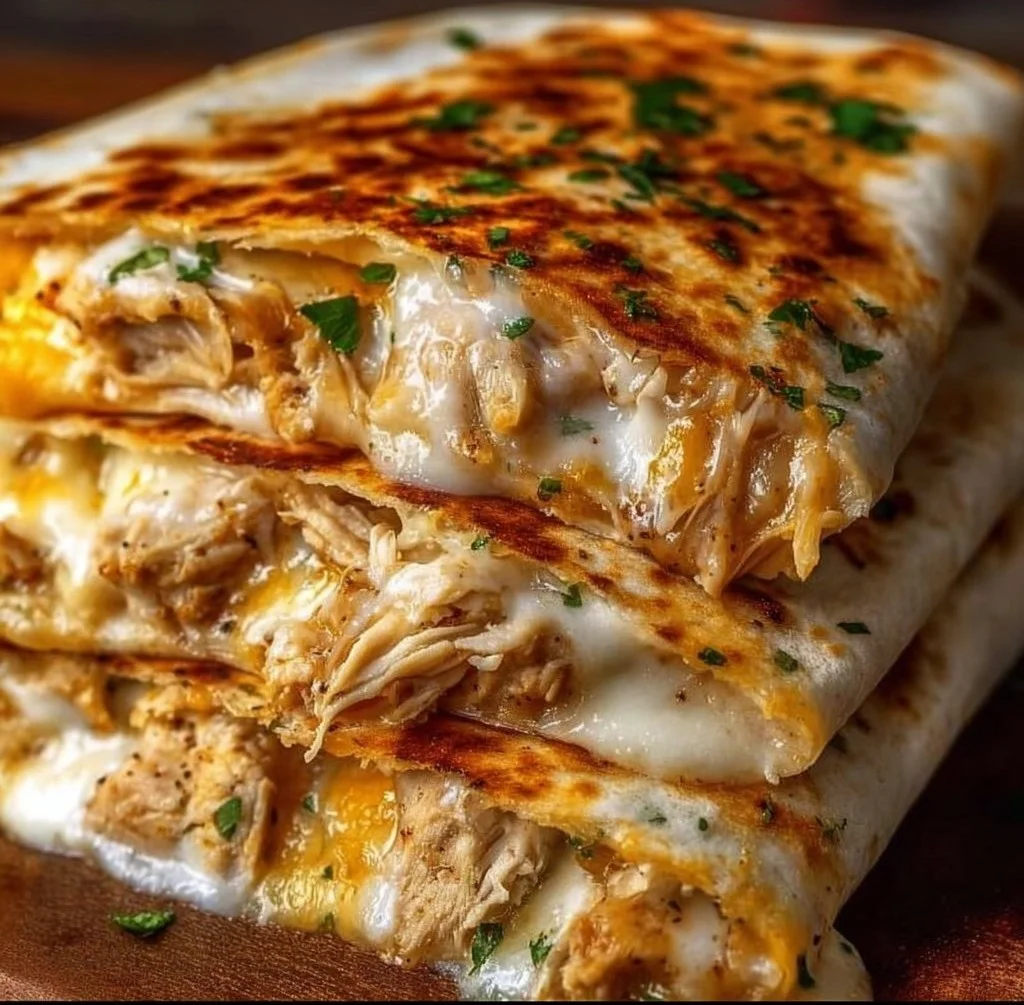
I still remember the first time I browned a flour tortilla until it crackled and the melted mozzarella inside stretched like warm taffy — that snap of toasted tortilla, garlicky butter on the outside, and a gooey, savory chicken filling hooked me immediately. These Cheesy Garlic Chicken Wraps are a weeknight game-changer: fast, forgiving, and adored by kids and adults alike. If you want a simple, satisfying meal that doubles as lunch leftovers, this is it. For a related take on cheesy chicken wraps, check out this version I like: cheesy chicken garlic wraps.
Why you’ll love this dish
This recipe checks a surprising number of boxes: it’s quick, budget-friendly, and endlessly adaptable. Use leftover roasted or rotisserie chicken and you’ll have dinner in under 20 minutes. The combo of cream cheese and mayo makes the filling luxuriously creamy without extra fuss, while two melting cheeses give that irresistible pull when you bite in. These wraps are perfect for a busy weeknight, school lunches, or a casual game-day plate.
For other quick chicken-wrap ideas, you might also enjoy this spin on handheld chicken tenders: air fryer garlic chicken tenders.
The cooking process explained
Before you dive in, here’s a quick overview so you know what to expect:
- Mix shredded chicken with spices, cheeses, cream cheese and mayo until smooth and cohesive.
- Spoon the filling onto tortillas, add optional greens or tomato, then roll tightly.
- Brush the outside with garlic butter and toast in a skillet until golden, flipping to brown all sides.
- Cut in half and serve warm with your favorite dip.
This recipe is assembly-driven with a short finish on the skillet — no baking required unless you prefer a panini press or oven finish.
What you’ll need
- 2 cups cooked shredded or chopped chicken (rotisserie or leftover roast chicken works great)
- 1 tablespoon olive oil (optional — to warm chicken if you want)
- 1 teaspoon garlic powder
- 1/2 teaspoon onion powder
- Salt and black pepper, to taste
- 1 1/2 cups shredded mozzarella cheese (low-moisture melts best)
- 1/2 cup shredded cheddar cheese (adds sharpness)
- 1/4 cup softened cream cheese (room temperature for easy mixing)
- 2 tablespoons mayonnaise (for creaminess)
- 2 tablespoons chopped fresh parsley or 1 teaspoon dried (fresh is brighter)
- 4 large flour tortillas
- 2 tablespoons melted butter
- 1 teaspoon minced garlic
- Optional: baby spinach, shredded lettuce, or sliced tomatoes
Substitution notes:
- Swap Greek yogurt for mayo to lighten the filling (use plain, full-fat for best texture).
- Use pepper jack for a spicy kick, or provolone for a milder, buttery melt.
- For gluten-free, try large gluten-free tortillas or use grilled lettuce leaves for a low-carb wrap.
Step-by-step instructions
- Prepare the filling. In a mixing bowl, combine the shredded chicken, garlic powder, onion powder, salt, and pepper. Add mozzarella, cheddar, softened cream cheese, mayonnaise, and parsley. Mix until the mixture is creamy and holds together. If it feels too dry, add a teaspoon of olive oil or a splash of milk.
- Assemble the wraps. Lay out the flour tortillas flat. Divide the filling into four portions. Spoon one portion into the center of each tortilla. Add baby spinach or sliced tomatoes if using, but don’t overfill.
- Roll tightly. Fold the short sides over the filling, then roll from the bottom to make a snug wrap. Tuck as you go to keep the filling secure.
- Make the garlic butter. In a small bowl, stir the melted butter with the minced garlic.
- Brush and toast. Heat a skillet over medium heat. Brush the outside of each wrap generously with the garlic butter. Place the wrap seam-side down in the skillet and toast 2–3 minutes per side until golden and crisp. Press gently with a spatula to help seal and melt the cheese inside.
- Serve. Remove from the skillet, slice each wrap in half on the diagonal, and serve warm with ranch, garlic aioli, or your favorite dipping sauce.
Keep the skillet at medium heat; too hot and the tortilla will brown before the cheese melts. If you’re reheating, a low oven or skillet is best to avoid burning.

01Ingredients
Filling Ingredients
Wrap Ingredients
02Method
- Preparation
- Assembly
- Toasting
- Serving
Tap a step when it's done. The next one lights up.
0 OF 13 DONE03Recipe notes
- 01Store cooled wraps in an airtight container for up to 3 days. For freezing, wrap each assembled (but not toasted) wrap tightly in foil and freeze for up to 2 months.
How did it turn out?
No ratings yet. Tap a star to be the first.
Snap a photo and tag @recipe_smoke1 so I can see how yours came out.
Best ways to enjoy it
Serve these wraps hot so the cheese is gooey. Pairing ideas:
- Sides: crisp coleslaw, kettle chips, or a simple arugula salad dressed with lemon.
- Dips: ranch dressing, garlic aioli, or a spicy Sriracha-mayo.
- Drinks: iced tea, a light citrus soda, or a sparkling lemonade for families.
For a party platter, cut into thirds and secure with toothpicks for easy finger food.
Storage and reheating tips
Refrigerator: Store cooled wraps in an airtight container for up to 3 days.
Freezing: Wrap each assembled (but not toasted) wrap tightly in foil and freeze for up to 2 months. Thaw overnight in the fridge before toasting.
Reheat: Toast in a skillet over low-medium heat or warm in a 350°F (175°C) oven for 8–10 minutes until heated through and cheese is melty. Microwave works in a pinch but may make tortillas soggy.
Food safety: Reheat leftovers to an internal temperature of 165°F (74°C) before serving.
Recipe variations
- BBQ Cheesy Chicken: Replace the mayo with 2 tbsp BBQ sauce and stir in corn or red onion. Top with cilantro.
- Buffalo Chicken Wrap: Mix in 2–3 tbsp buffalo sauce and swap cheddar for blue cheese crumbles.
- Vegetarian option: Use shredded roasted cauliflower or chickpeas seasoned similarly, with extra cream cheese for body.
- Low-carb: Use large collard green leaves or low-carb tortillas and omit mayonnaise for a lighter profile.
- Breakfast version: Add scrambled eggs and breakfast sausage to the filling and serve for brunch.
Common questions
How long will prep and cook take?
A: About 10 minutes to assemble if you have pre-cooked chicken, and 6–10 minutes to toast the wraps — roughly 20 minutes total.
Can I make these ahead for a party?
A: Yes. Assemble the wraps, wrap tightly in plastic, and refrigerate up to 24 hours. Toast just before serving for best texture.
Can I use shredded rotisserie chicken?
A: Absolutely — rotisserie chicken is one of the easiest shortcuts and adds great flavor.
What if my filling is too dry or too wet?
A: Too dry — add a teaspoon of olive oil or a bit more mayo. Too wet — add a tablespoon of extra shredded cheese or a few breadcrumbs to absorb moisture.
Are these freezer-friendly?
A: Yes — assemble without toasting, wrap in foil, and freeze up to 2 months. Thaw overnight and toast before eating.
Conclusion
For more ideas, check out Cheesy Garlic Chicken Wraps and my Cheesy Garlic Chicken Wraps.
 Chicken
 Skillet Dinners
 Chicken
