Spicy Tuna Rice Balls
These spicy tuna rice balls are a quick, customizable, and portable snack, perfect for lunches and picnics, combining tender sushi rice with a creamy, spicy tuna filling.

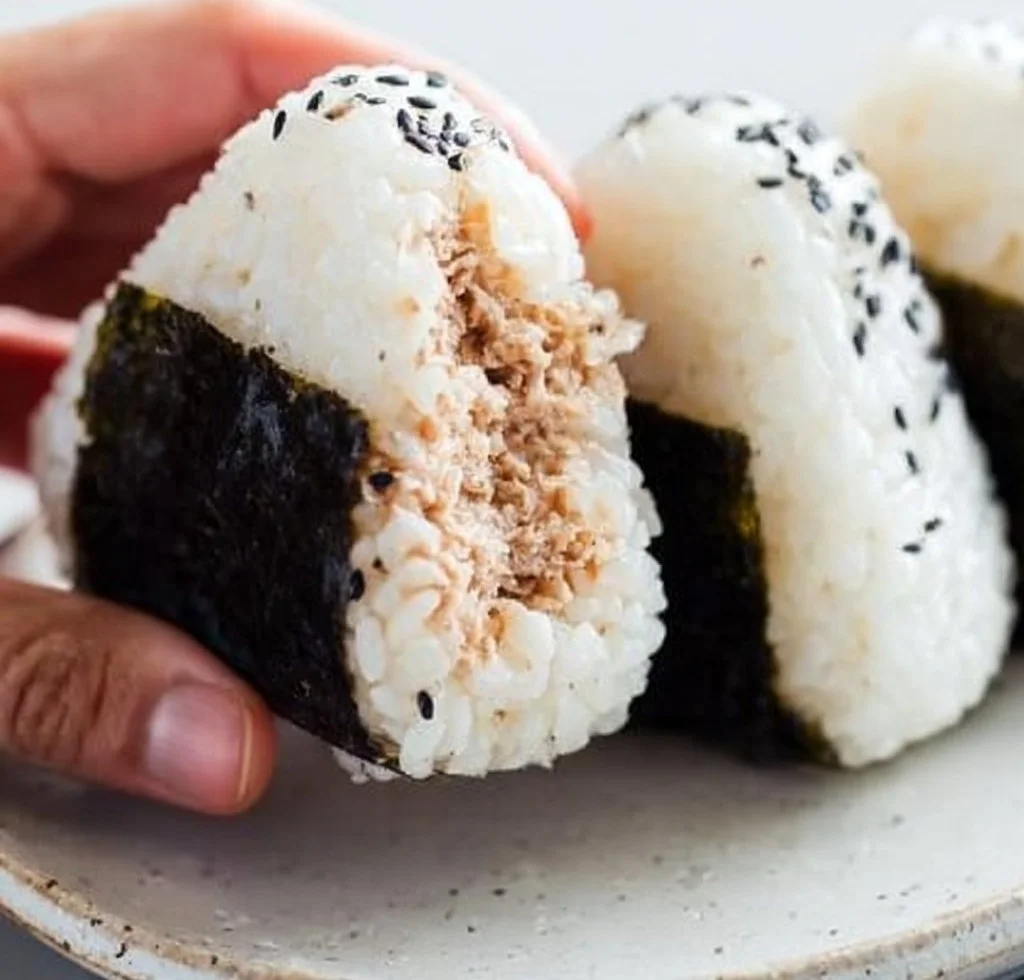
I still remember the first time I wrapped my hands around a warm, slightly spicy tuna center tucked inside tender sushi rice — simple, comforting, and oddly addictive. These spicy tuna rice balls are the sort of thing I make when I want a no-fuss lunch, a quick picnic snack, or when I need something kid-approved but with a grown-up kick. They come together fast, travel well, and taste best eaten warm or at room temperature. If you like portable tuna bites, you might also enjoy this take on an air-fryer low-carb tuna melts for another speedy tuna-based meal.
Why you’ll love this dish
Why make yet another rice-and-tuna snack? Because these rice balls hit several sweet spots at once: they’re budget-friendly, customizable, and require just pantry staples plus a sheet of nori. Unlike a sandwich that gums up in transit, these keep their texture and are easy to eat on the go. They’re also a great gateway to Japanese-style cooking for home cooks who want big flavor with minimal fuss.
Beyond convenience, they’re a great way to use canned tuna in a more exciting format than a salad or melt. Make them for a lunchbox, an appetizer platter, or a satisfying solo snack.
How this recipe comes together
- Cook the sushi rice until tender and slightly sticky. Let it cool just enough to handle.
- Mix canned tuna with Kewpie mayo, Sriracha, and a pinch of salt for a creamy, spicy filling.
- Shape a hand-sized scoop of rice around a spoonful of the tuna mix into a triangle or oval.
- Wrap each ball in a strip of nori and finish with sesame seeds or green onions if you like.
This quick flow gives you an onigiri-style rice ball that’s stable, flavorful, and ready in roughly 30–40 minutes (most time is passive rice cooking).
What you’ll need
- 2 cups sushi rice (short-grain rice) — rinsed until water runs clear
- 2 1/2 cups water
- 1 can (5 oz) tuna, drained
- 2 tablespoons Kewpie mayonnaise (or regular mayo if needed)
- 1 teaspoon Sriracha, or to taste
- Salt, to taste
- Nori (roasted seaweed) sheets, cut into strips
- Sesame seeds (optional)
- Chopped green onions (optional)
Notes and substitutions:
- If you don’t have Kewpie, use good-quality mayonnaise and add a drop of rice vinegar for tang.
- For lower sodium, rinse canned tuna briefly and taste before adding salt.
- If you prefer less heat, cut the Sriracha or swap it for a mild chili sauce.
Directions to follow
- Rinse the sushi rice under cold water until the rinse runs almost clear. This removes excess starch.
- Put the rice and 2 1/2 cups water in a rice cooker and cook according to the manufacturer’s instructions. If cooking on the stovetop, bring to a boil, reduce to low, cover, and simmer 15–18 minutes; rest 10 minutes off heat.
- In a bowl, flake the drained tuna. Add Kewpie mayonnaise, Sriracha, and a pinch of salt. Mix until smooth and creamy. Taste and adjust spice or salt.
- When the rice is ready, transfer it to a bowl and let it cool until just warm to the touch — still pliable but not steaming hot.
- Wet your hands with water (or a mix of water and a pinch of salt to lightly season) to prevent sticking. Take a handful of rice and flatten it slightly in your palm.
- Spoon about 1–2 tablespoons of the tuna mixture into the center of the rice. Fold the rice around the filling and gently press to form a triangle or oval. Don’t compress too tightly — you want the rice to hold but not be rock-hard.
- Wrap a strip of nori around the rice ball; the nori acts like a handle and adds savory crunch. If humidity makes nori soggy, wrap just before eating.
- Optionally sprinkle with sesame seeds and chopped green onions. Serve warm or at room temperature.
01Ingredients
For the rice
For the filling
02Method
- Preparation
- Shaping Rice Balls
Tap a step when it's done. The next one lights up.
0 OF 7 DONE03Recipe notes
- 01Store in an airtight container in the fridge for up to 24 hours for best texture. Enjoy with options like pickled cucumbers or edamame for a complete meal.
How did it turn out?
No ratings yet. Tap a star to be the first.
Snap a photo and tag @recipe_smoke1 so I can see how yours came out.
Best ways to enjoy it
These rice balls are perfect on their own, but you can make a small bento around them: pickled cucumbers, edamame, and a simple miso soup are classic companions. For a heartier plate, pair them with a crisp salad or steamed veggies. If you want another bold bowl-style meal to pair on a menu night, try a spicy stir-fry like this spicy ground beef stir-fry bowl for contrasting textures and flavors.
Presentation tips:
- Line a platter with shiso or lettuce leaves and arrange rice balls in rows with dipping sauces (extra Sriracha mayo or soy sauce).
- For parties, make mini rice balls and skewer them with decorative picks.
How to store & freeze
Short-term:
- Store rice balls in an airtight container in the fridge for up to 24 hours. Nori will soften over time; for best texture, store nori separately and wrap just before serving.
- Keep the tuna mixture in a sealed container up to 2 days; assemble rice balls only when you’re ready to eat for maximum freshness.
Reheating:
- Reheat wrapped rice balls in the microwave for 20–30 seconds (check temperature) or briefly pan-sear each side in a nonstick skillet for a toasty outer layer (yaki-onigiri style).
Freezing:
- I don’t recommend freezing already filled onigiri with mayo-based filling — the texture and flavor will suffer. If you want freezing storage, freeze plain rice balls (no mayo filling) wrapped tightly, then thaw and fill fresh.
Food safety:
- Because the filling contains mayonnaise, keep these chilled and don’t leave at room temperature more than 2 hours. For packing lunches, use an insulated container with a cold pack.
Creative twists
- Crunchy spicy: Add finely chopped tempura bits (tenkasu) or toasted panko into the tuna for texture.
- Veggie-packed: Mix finely diced cucumber or scallion into the tuna for freshness.
- Creamy avocado: Fold in small avocado pieces for a buttery contrast (add just before serving to avoid browning).
- Yaki-onigiri version: Brush with a soy-sweet glaze and grill or pan-sear until crisp for a smoky alternative.
- Vegetarian swap: Replace tuna with spicy mashed chickpeas or tofu mayo for a plant-based filling.
Your questions answered
How long does this take from start to finish?
A: Most of the time is passive rice cooking. Active hands-on time is about 15–20 minutes; total time around 30–40 minutes including rice cooking and cooling.
Can I use leftover rice?
A: Yes — slightly chilled leftover sushi-style rice works, but it may be less sticky. If the rice is dry, sprinkle a few drops of water and warm briefly to restore pliability.
Is Kewpie mayonnaise necessary?
A: Kewpie adds umami and a silkier texture because it contains MSG and egg yolks. Regular mayonnaise works in a pinch; you can add a dash of soy sauce for extra depth.
Are these safe for kids?
A: Yes, if you reduce or omit the Sriracha. Keep them chilled and pack with an ice pack for lunches. Watch for choking hazards with young children — make smaller, bite-sized portions as needed.
Can I make these gluten-free?
A: The basic recipe is gluten-free if you use gluten-free Sriracha and ensure the canned tuna and nori don’t contain additives with gluten. Check labels if sensitive.
Conclusion
If you want more inspiration for spicy tuna rice-ball styles, see this detailed how-to from Spicy Tuna Onigiri (How to Make Onigiri) – A Beautiful Plate, which offers extra shaping and filling tips. Looking for more? Try my Chicken Rice Ball.
 Lunch
Lunch Lunch
Lunch Lunch
Lunch
